SpringBoot
1. 微服务阶段
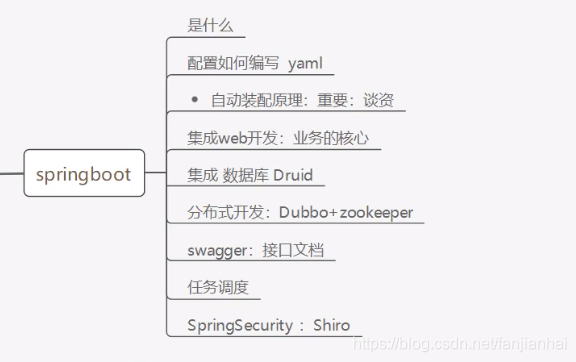
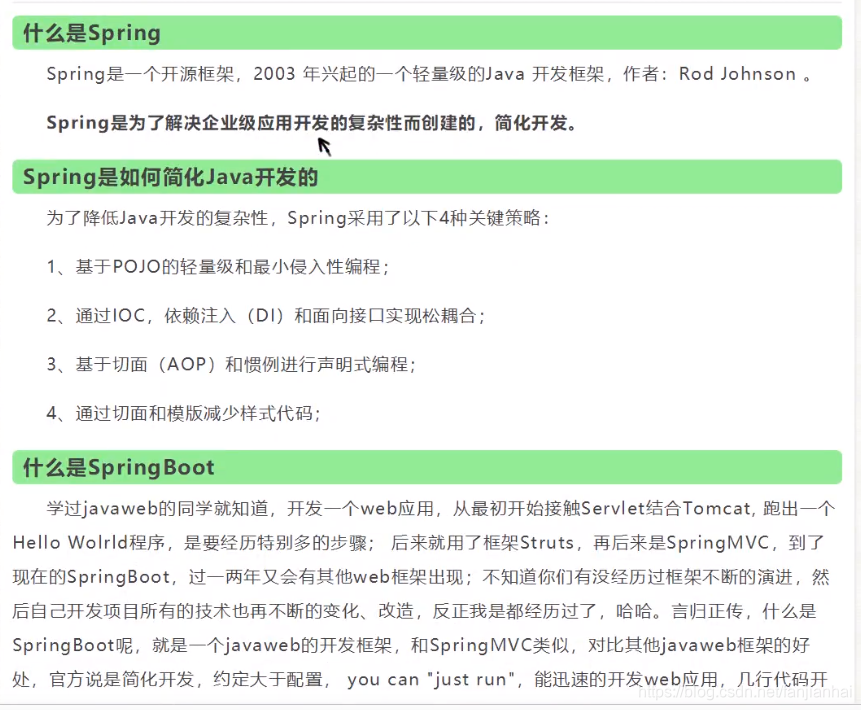
2. 什么是SpringBoot
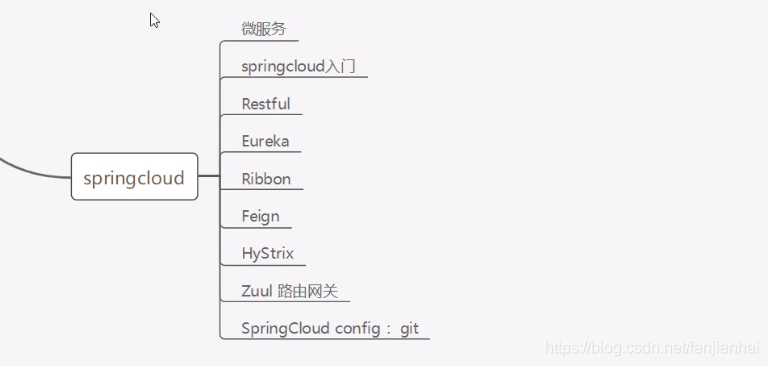
3. 微服务

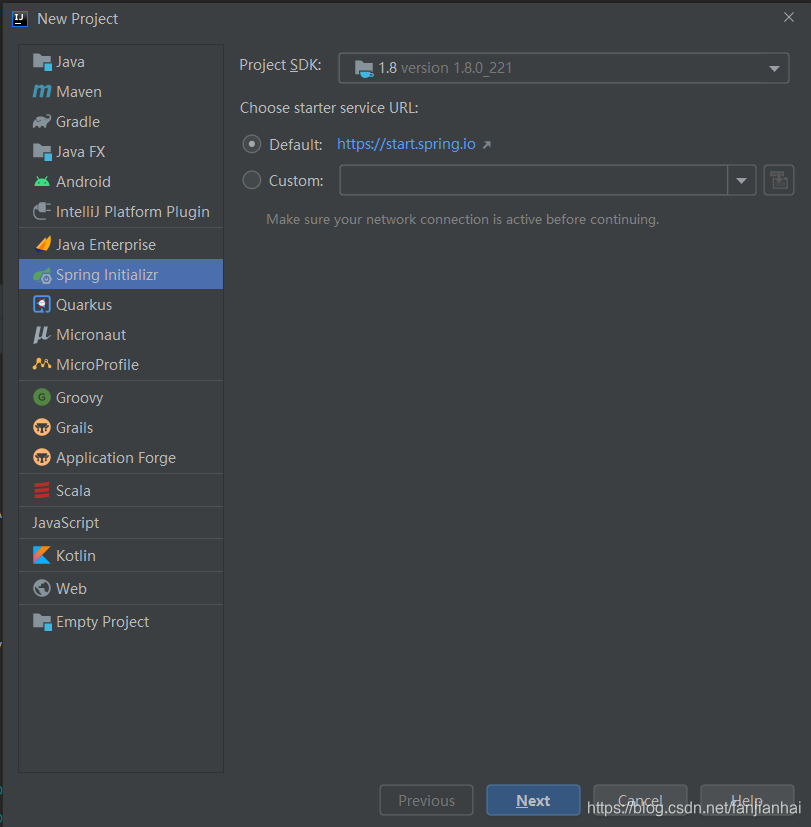
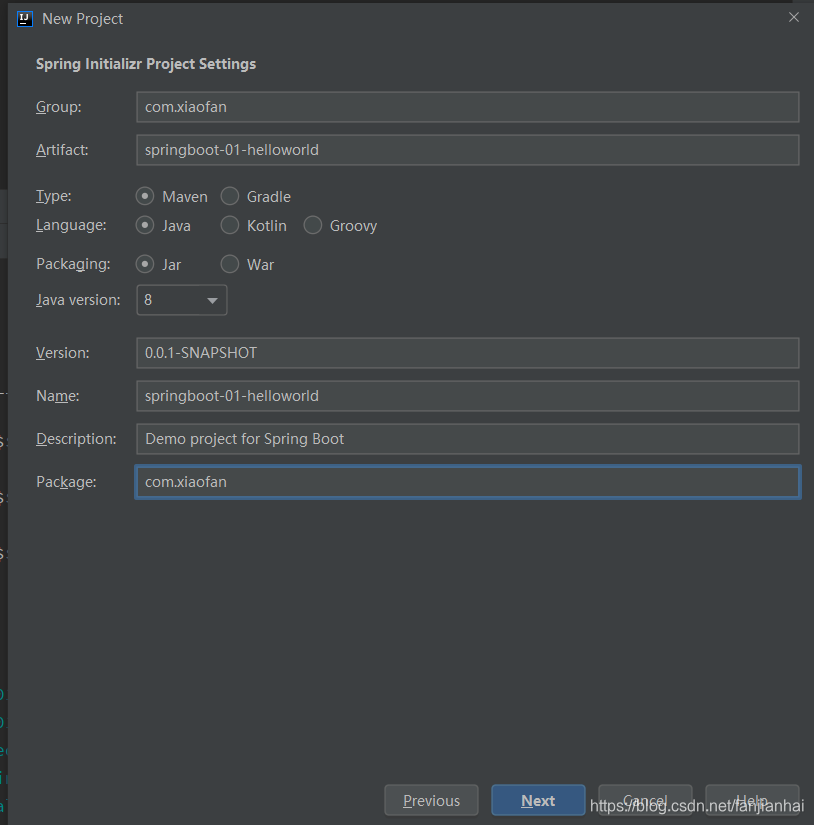
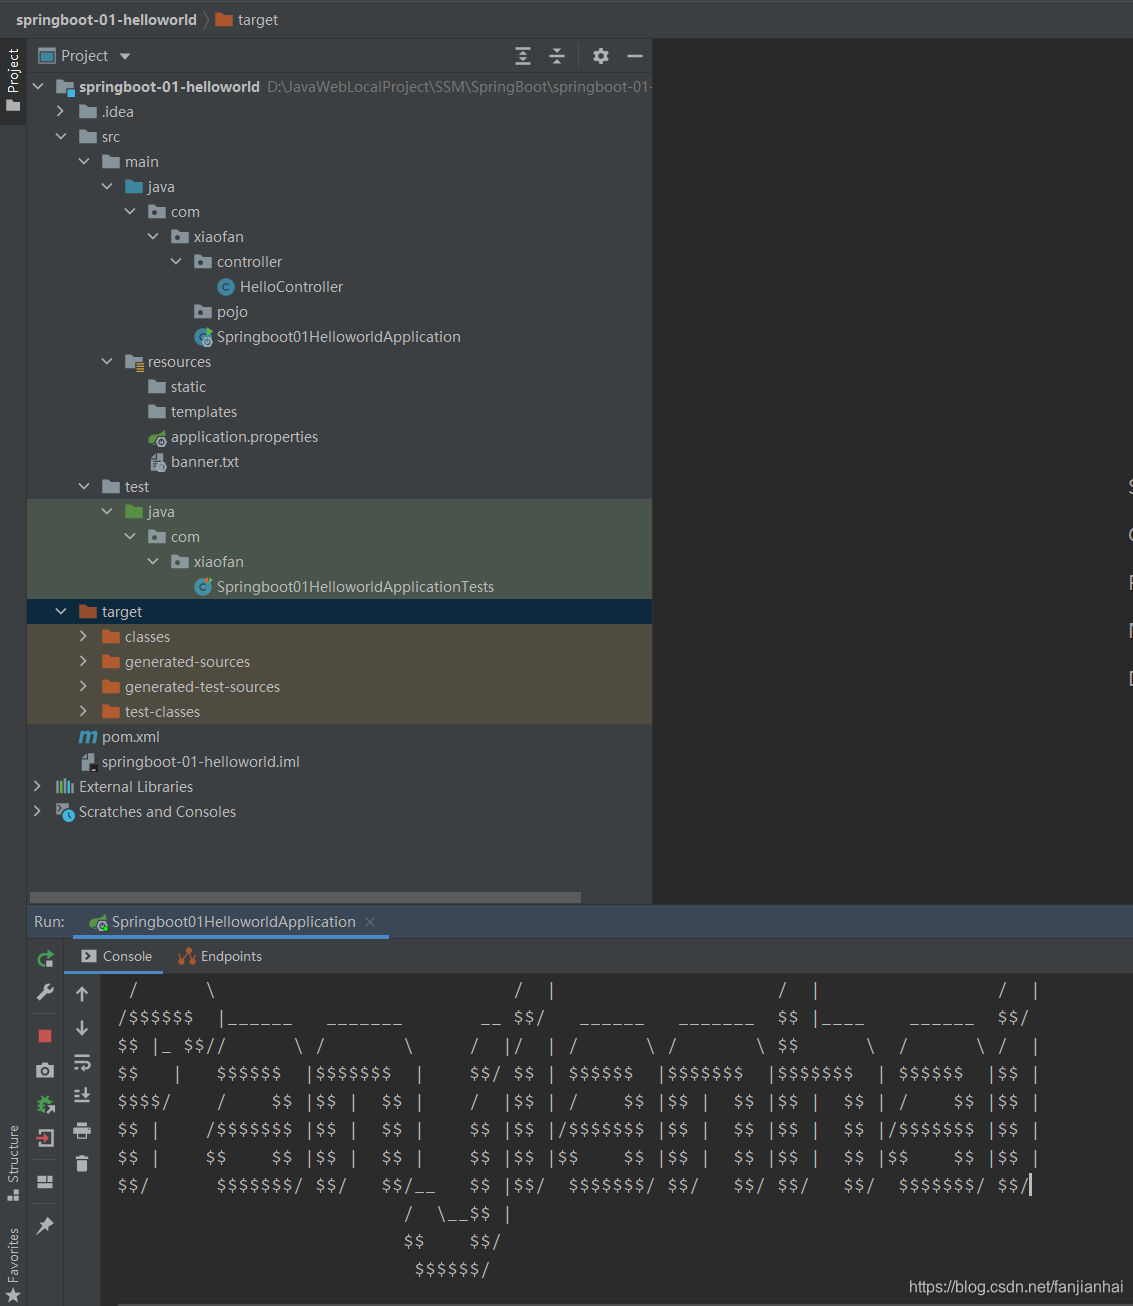
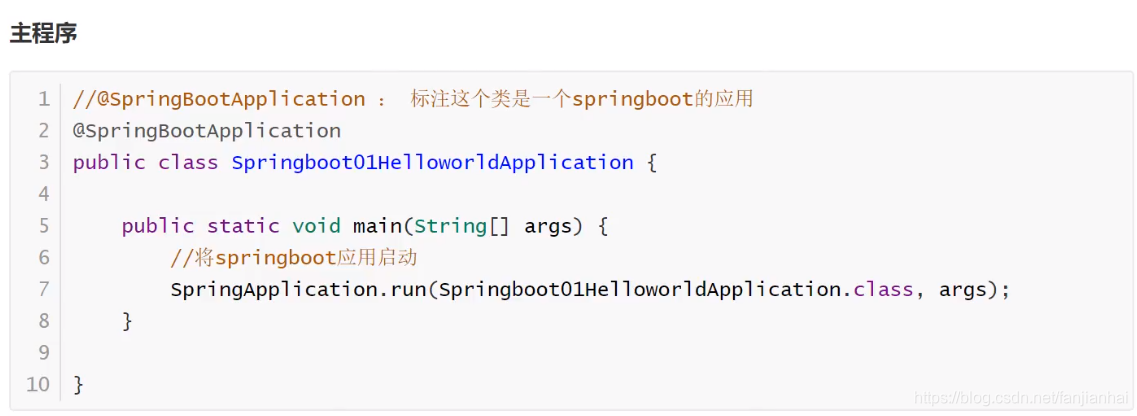
4. 第一个springboot项目搭建 springboot-01-helloworld

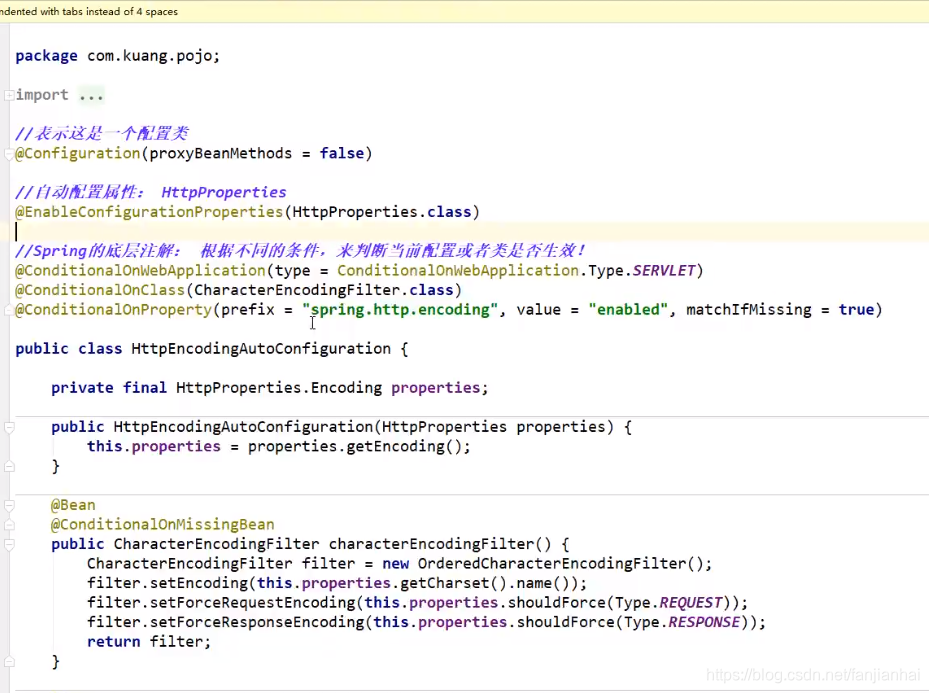
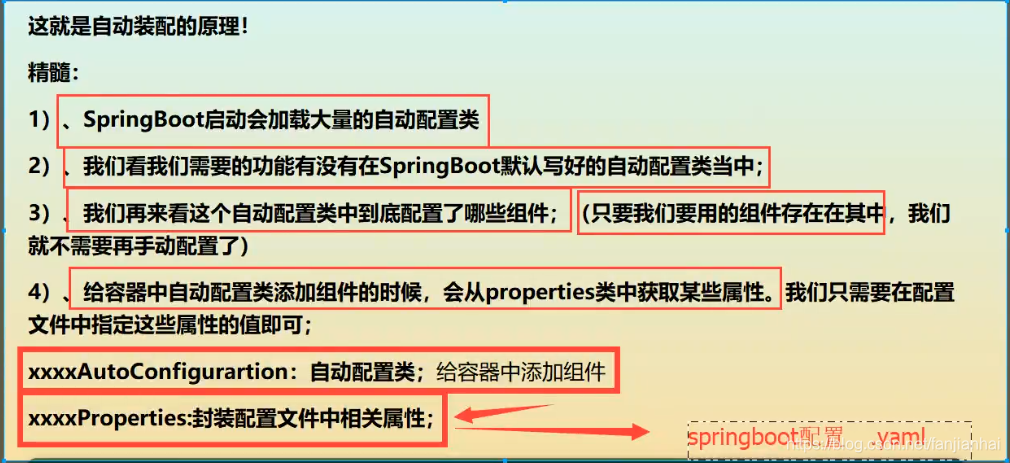
5. SpringBoot自动装配原理
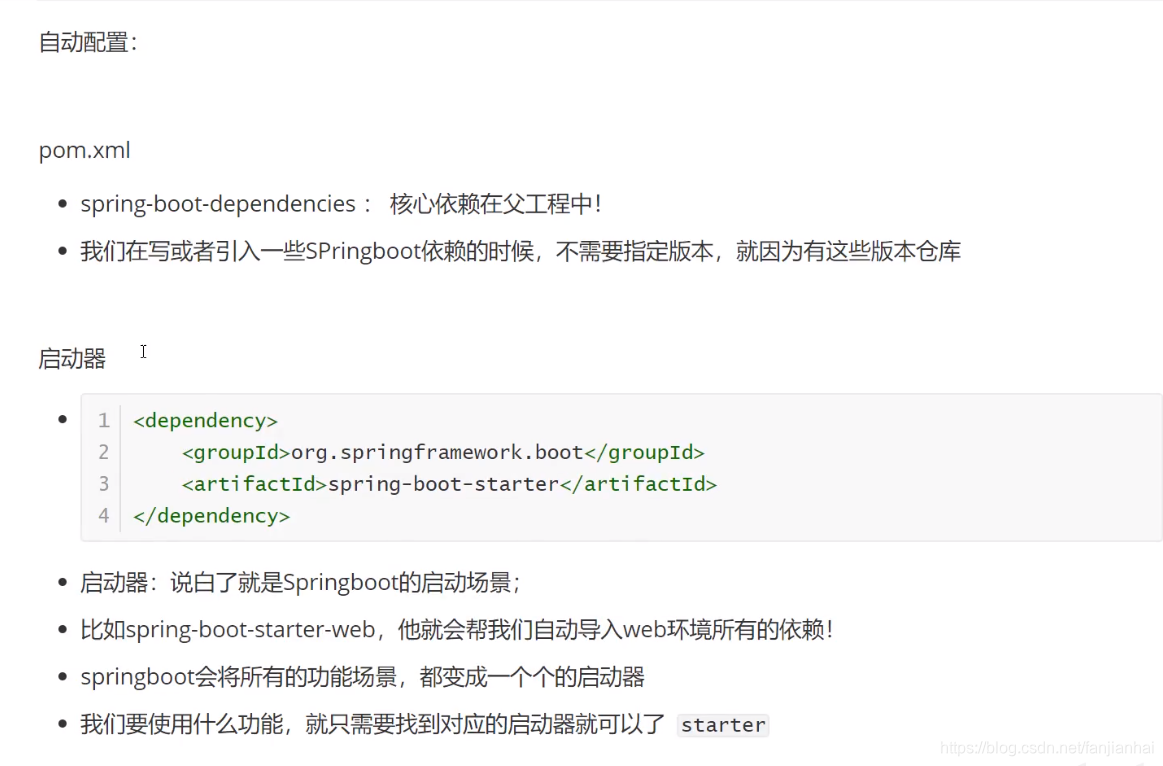
5.1. 自动装配原理分析
@SpringBootApplication
@SpringBootConfiguration
- @Configuration
- @Component
- @Configuration
@EnableAutoConfiguration 自动导入包
@AutoConfigurationPackage 将 添加该注解的类所在的package 作为 自动配置package 进行管理
- @Import({Registrar.class})
@Import({AutoConfigurationImportSelector.class}) 自动导入包的核心
- getAutoConfigurationEntry(annotationMetadata); 获取自动装配的实体
getCandidateConfigurations(annotationMetadata, attributes); 获取候选的配置
protected Class<?> getSpringFactoriesLoaderFactoryClass() {
1
2
return EnableAutoConfiguration.class;
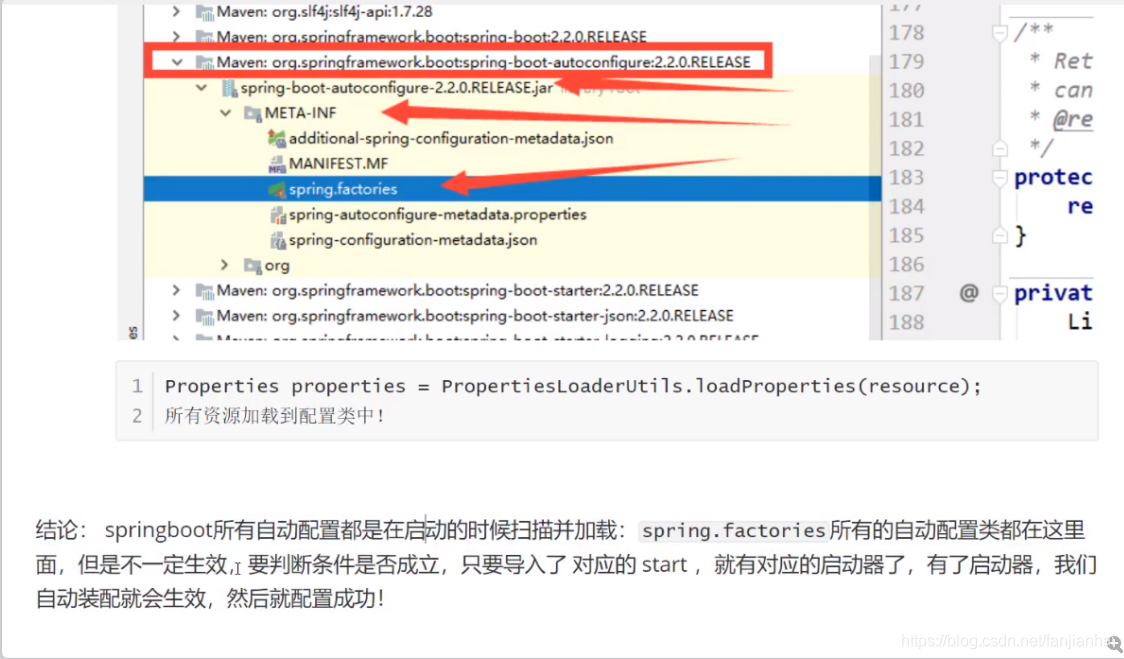
} 标注了EnableAutoConfiguration注解的类- public static List loadFactoryNames(): 获取所有的加载配置
loadFactories() loadSpringFactories()
1
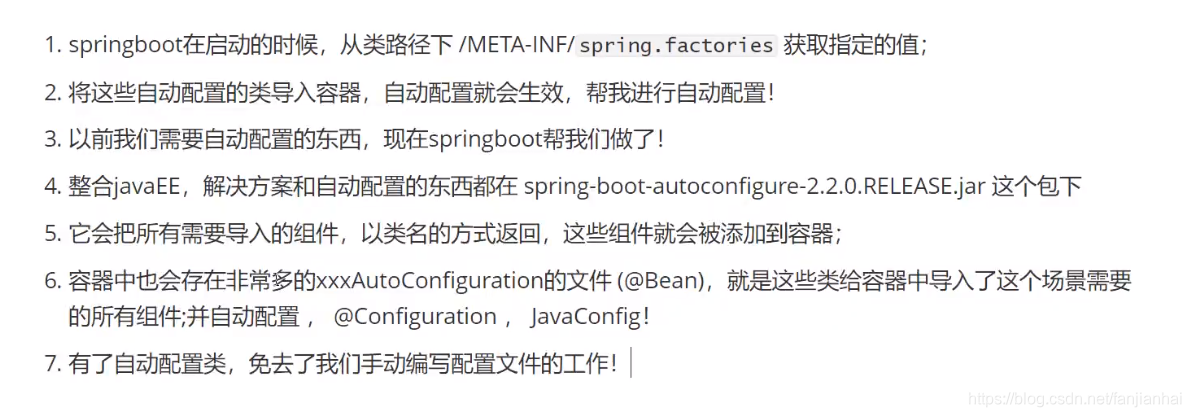
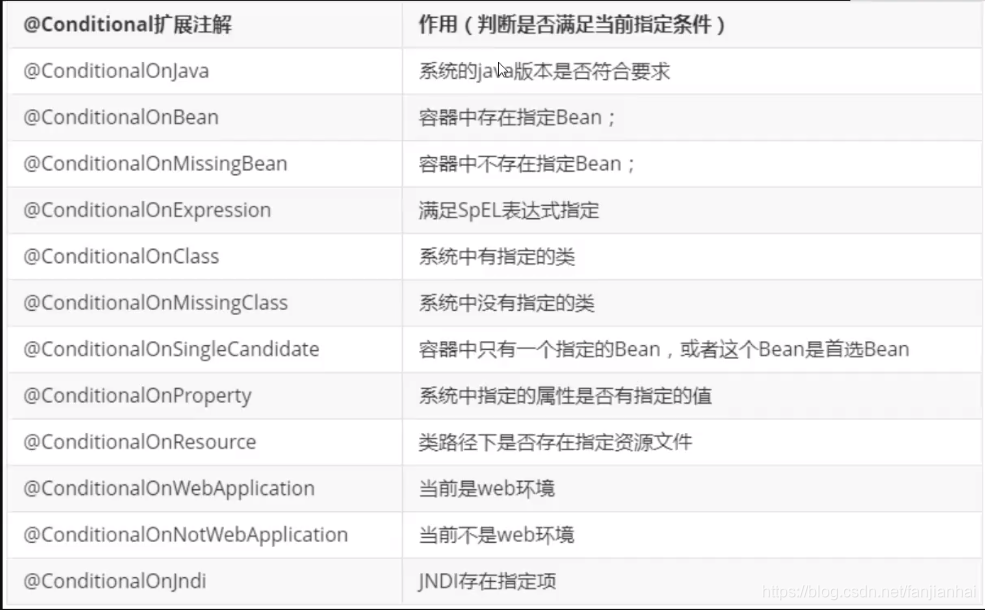
- 项目资源: classLoader.getResources(FACTORIES_RESOURCE_LOCATION) "META-INF/spring.factories"; 从这里获取配置 spring-boot-autoconfigure-2.2.0.RELEASE.jar META-INF spring.factories;所有的自动配置类都在这里了!(自动配置生效,需要导入对应的start核心注解:@ConditionalOnXXX, 如果这里的条件都满足,才生效!)
系统资源:classLoader.getSystemResources(FACTORIES_RESOURCE_LOCATION)
1
- 从这些资源中遍历了所有的nextElement(自动配置),遍历完成之后,封装成Properties供我们使用
@ComponentScan 扫描当前主启动类同级的包
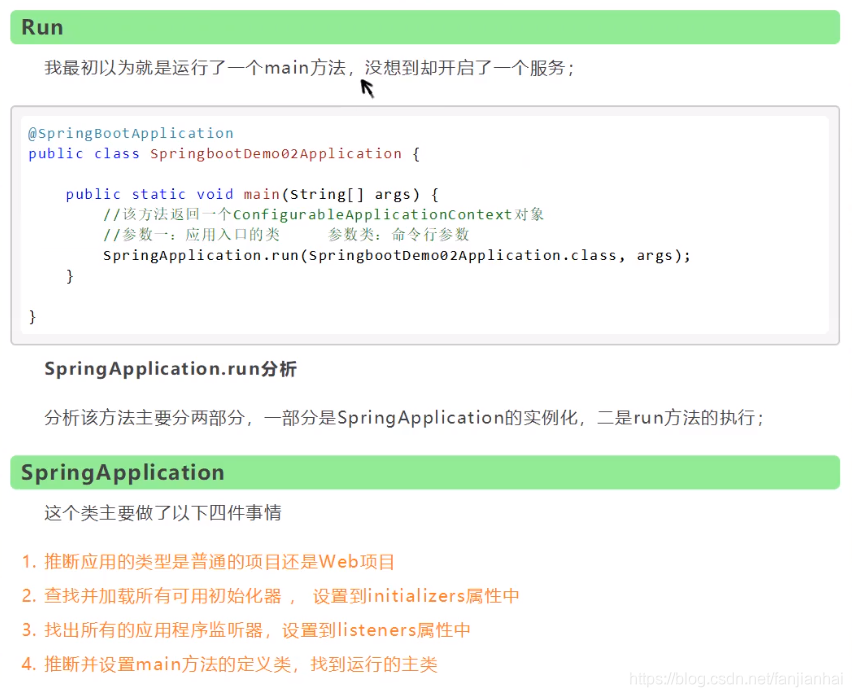
5.2. SpringApplication 启动 run
5.3. 自动配置原理再理解
6. yaml讲解
1 2 3 4 5 6 7 8 9 10 11 12 13 14 15 16 17 18 19 20 21 22 23 24 |
# k = v # 对空格要求十分严格 # 普通的 key-value # 注入到我们的配置类中! name: xiaofan # 对象 student: name: xiaofan age: 3 # 行内写法 teacher: {name: xiaofan, age: 3} # 数组 pets: - cat - dog - pig # 行内写法 animals: [cat, dog, pig] |
- yaml
1 2 3 4 5 6 7 8 9 10 11 12 13 14 15 16 17 18 19 20 21 22 23 24 25 26 27 28 29 30 31 32 33 34 35 36 37 38 39 40 41 42 43 44 45 46 47 48 49 50 51 52 53 54 55 56 57 58 59 60 61 62 63 64 65 66 67 68 69 70 71 72 73 74 75 76 77 78 79 80 81 82 83 84 85 86 87 88 89 90 91 92 93 94 95 96 97 98 99 100 101 102 |
package com.xiaofan.pojo; import org.springframework.boot.context.properties.ConfigurationProperties; import org.springframework.stereotype.Component; import java.util.Date; import java.util.List; import java.util.Map; @Component @ConfigurationProperties(prefix = "person") public class Person { private String name; private int age; private boolean happy; private Date birth; private Map<String, Object> maps; private List<Object> lists; private Dog dog; public Person() { } public Person(String name, int age, boolean happy, Date birth, Map<String, Object> maps, List<Object> lists, Dog dog) { this.name = name; this.age = age; this.happy = happy; this.birth = birth; this.maps = maps; this.lists = lists; this.dog = dog; } public String getName() { return name; } public void setName(String name) { this.name = name; } public int getAge() { return age; } public void setAge(int age) { this.age = age; } public boolean isHappy() { return happy; } public void setHappy(boolean happy) { this.happy = happy; } public Date getBirth() { return birth; } public void setBirth(Date birth) { this.birth = birth; } public Map<String, Object> getMaps() { return maps; } public void setMaps(Map<String, Object> maps) { this.maps = maps; } public List<Object> getLists() { return lists; } public void setLists(List<Object> lists) { this.lists = lists; } public Dog getDog() { return dog; } public void setDog(Dog dog) { this.dog = dog; } @Override public String toString() { return "Person{" + "name='" + name + '\'' + ", age=" + age + ", happy=" + happy + ", birth=" + birth + ", maps=" + maps + ", lists=" + lists + ", dog=" + dog + '}'; } } |
1 2 3 4 5 6 |
<!-- 解决有红色提示问题 --> <dependency> <groupId>org.springframework.boot</groupId> <artifactId>spring-boot-configuration-processor</artifactId> <optional>true</optional> </dependency> |
1 2 3 4 5 6 7 8 9 10 11 12 13 14 |
person: name: xiaofan${random.int} age: ${random.int} happy: true birth: 2021/11/07 hello: 小小的一个 maps: {k1: v1, k2: v2} lists: - code - music - girl dog: name: ${person.hello1:hello}_旺财 age: 3 |
- properties
1 2 |
# 加载指定的配置文件 @PropertySource(value="classpath:xiaofan.properties") |
6.1. yaml 和properties的对比
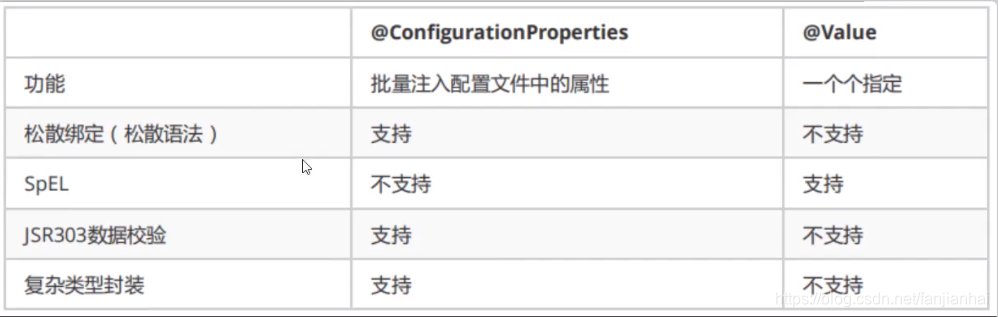
松散绑定
1 2 3 4@Component @ConfigurationProperties(prefix = "person") public class Person { private String lastName;
1 2 |
person: last-name: xiaofan${random.int} |
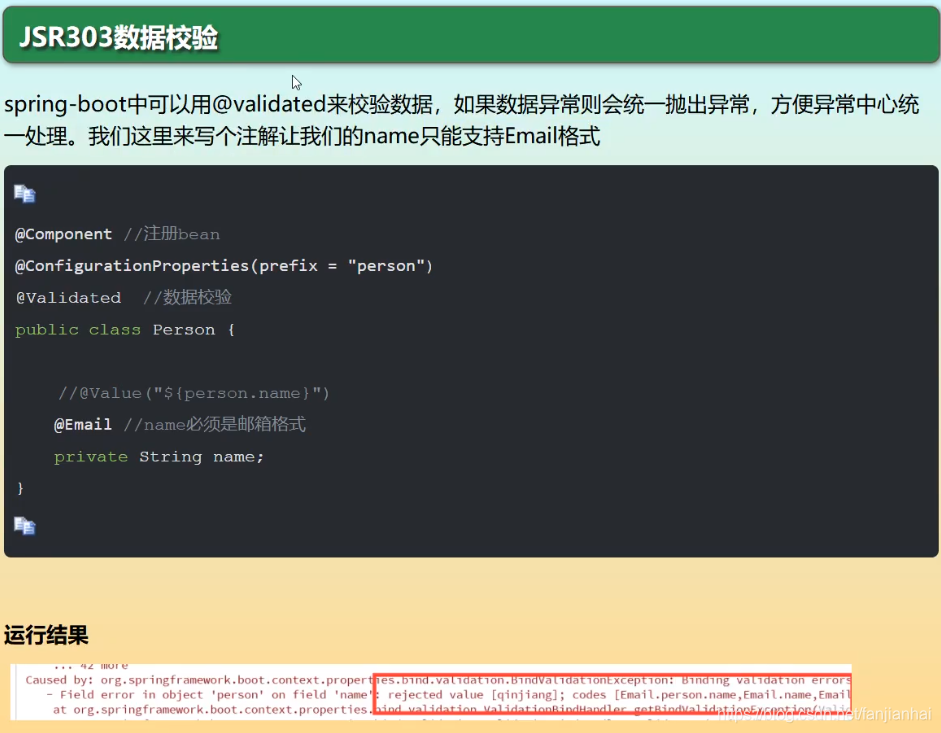
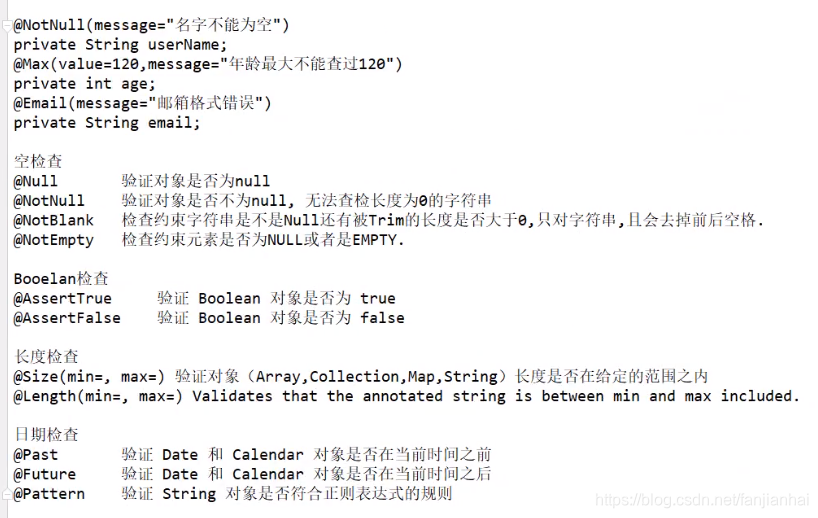
- JSR303 数据校验
1 2 3 4 |
<dependency> <groupId>org.springframework.boot</groupId> <artifactId>spring-boot-starter-validation</artifactId> </dependency> |
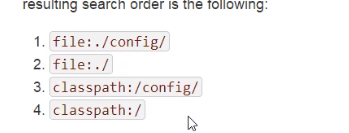
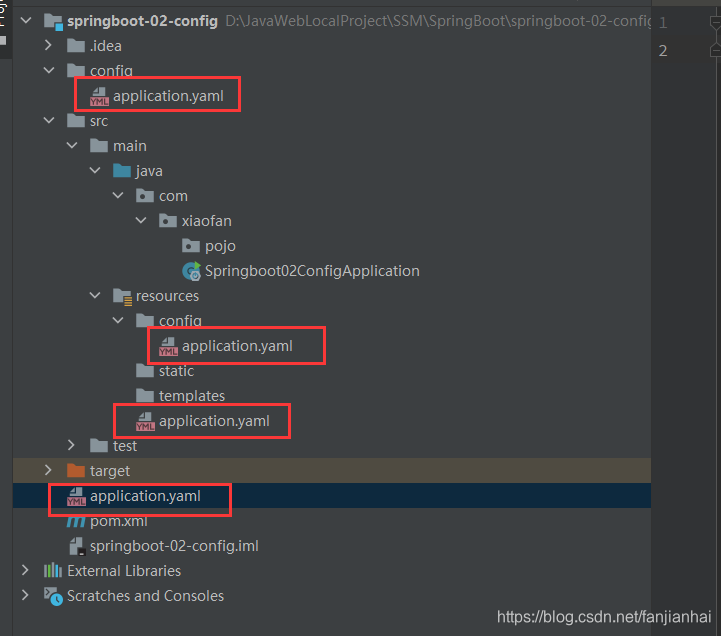
7. 多环境配置及配置文件的位置
- 配置文件的位置
- 多环境
1 2 3 4 5 6 7 8 9 10 11 12 13 14 15 16 17 18 |
spring: profiles: active: test --- server: port: 8088 spring: config: activate: on-profile: dev --- server: port: 8089 spring: config: activate: on-profile: test |
9 Web开发探索
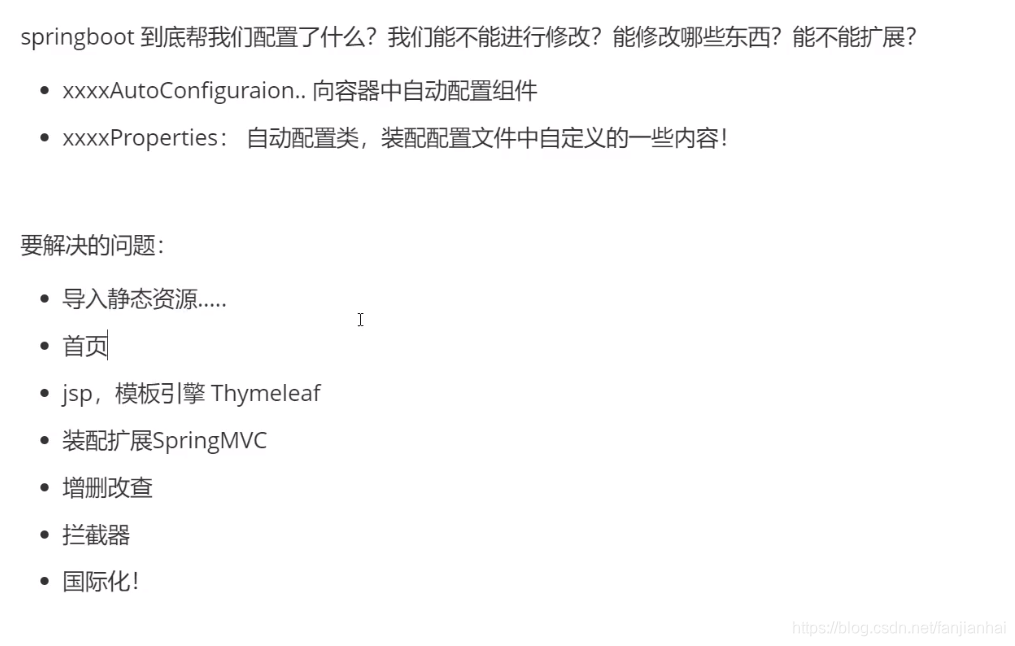
9.1. 静态资源导入
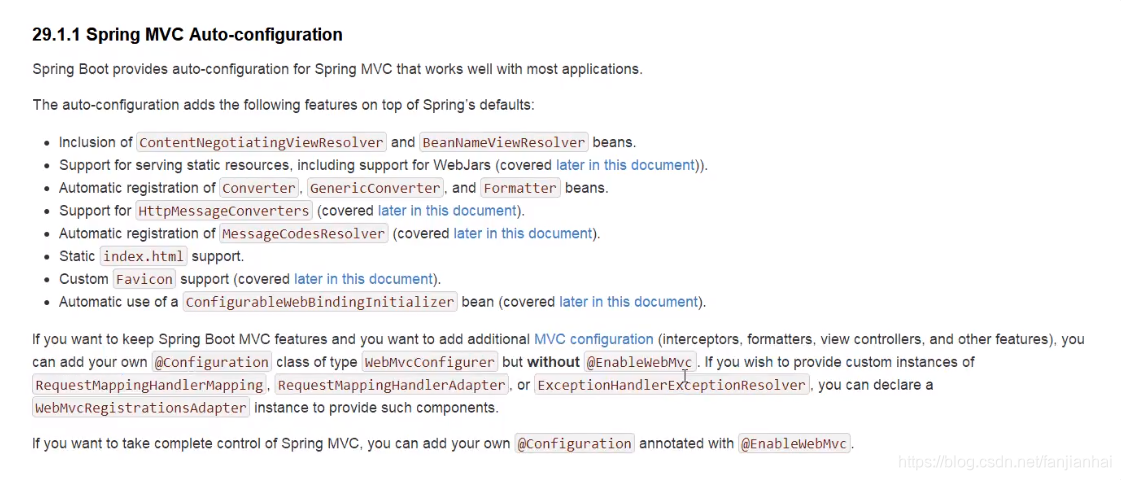
WebMvcAutoConfiguration
内部类:EnableWebMvcConfiguration (WebProperties)
1 2 3 4 5 6 7 8 9 10 11 12 13 14 15 16 17 18 19 20 21 |
public void addResourceHandlers(ResourceHandlerRegistry registry) { // 是否自定义静态资源路径,自定义之后,默认的将会失效 if (!this.resourceProperties.isAddMappings()) { logger.debug("Default resource handling disabled"); } else { Duration cachePeriod = this.resourceProperties.getCache().getPeriod(); CacheControl cacheControl = this.resourceProperties.getCache().getCachecontrol().toHttpCacheControl(); // 如果配置了webjars: https://www.webjars.org/ (一般不用) if (!registry.hasMappingForPattern("/webjars/**")) { this.customizeResourceHandlerRegistration(registry.addResourceHandler(new String[]{"/webjars/**"}).addResourceLocations(new String[]{"classpath:/META-INF/resources/webjars/"}).setCachePeriod(this.getSeconds(cachePeriod)).setCacheControl(cacheControl).setUseLastModified(this.resourceProperties.getCache().isUseLastModified())); } // 没有自定义路径,new String[]{"classpath:/META-INF/resources/", "classpath:/resources/", "classpath:/static/", "classpath:/public/"}; private String[] staticLocations; String staticPathPattern = this.mvcProperties.getStaticPathPattern(); if (!registry.hasMappingForPattern(staticPathPattern)) { this.customizeResourceHandlerRegistration(registry.addResourceHandler(new String[]{staticPathPattern}).addResourceLocations(WebMvcAutoConfiguration.getResourceLocations(this.resourceProperties.getStaticLocations())).setCachePeriod(this.getSeconds(cachePeriod)).setCacheControl(cacheControl).setUseLastModified(this.resourceProperties.getCache().isUseLastModified())); } } } |
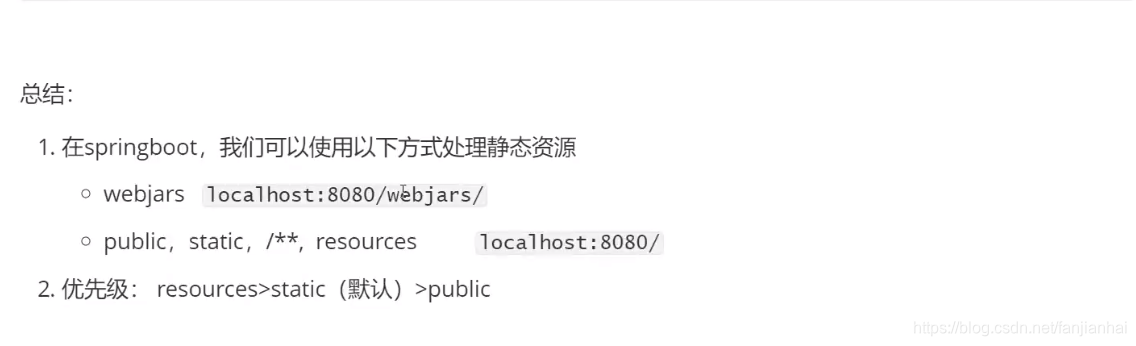
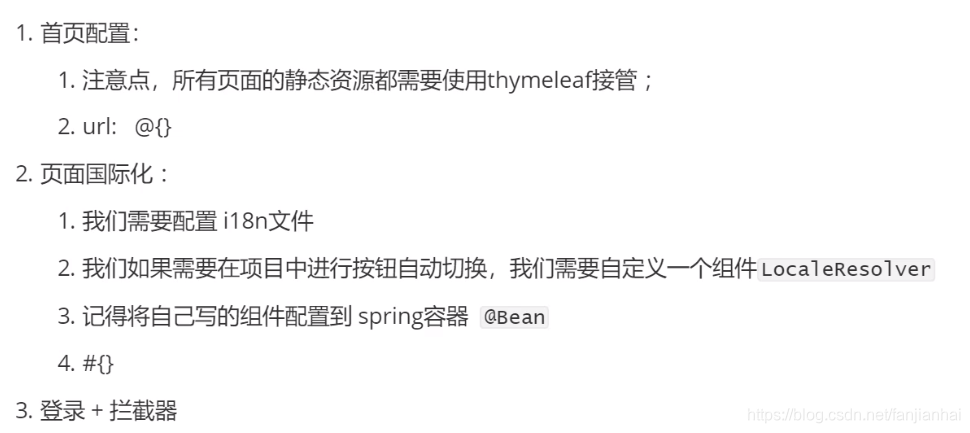
9.2. 首页
直接把首页放入到static目录即可!
9.3. Thymeleaf模板引擎
- 官网:https://www.thymeleaf.org/
- Github: https://github.com/thymeleaf
- 导入starter
1 2 3 4 |
<dependency> <groupId>org.springframework.boot</groupId> <artifactId>spring-boot-starter-thymeleaf</artifactId> </dependency> |
1 2 3 4 5 6 7 8 9 10 11 12 13 14 15 |
<!DOCTYPE html> <html lang="en" xmlns:th="http://www.thymeleaf.org"> <head> <meta charset="UTF-8"> <title>Title</title> </head> <body> <!--所有html元素都可以被thymeleaf替换接管: th:元素名--> <div th:text="${msg}"></div> <div th:utext="${msg}"></div> <br> <h3 th:each="user:${users}" th:text="${user}"></h3> </body> </html> |
1 2 3 4 5 6 7 8 9 10 11 12 13 14 15 16 17 18 |
package com.xiaofan.controller; import org.springframework.stereotype.Controller; import org.springframework.ui.Model; import org.springframework.web.bind.annotation.GetMapping; import java.util.Arrays; @Controller public class HelloController { @GetMapping("/test") public String hello(Model model) { model.addAttribute("msg", "<h1>hello springboot!</h1>"); model.addAttribute("users", Arrays.asList("中国", "美国", "日本")); return "test"; } } |
9.4. MVC配置原理
1 2 3 4 5 6 7 8 9 10 11 12 13 14 15 16 17 18 19 20 21 22 23 24 25 26 27 |
package com.xiaofan.config; import org.springframework.context.annotation.Bean; import org.springframework.context.annotation.Configuration; import org.springframework.web.servlet.View; import org.springframework.web.servlet.ViewResolver; import org.springframework.web.servlet.config.annotation.WebMvcConfigurer; import java.util.Locale; // 扩展springmvc @Configuration public class MyMvcConfig implements WebMvcConfigurer { @Bean public ViewResolver myViewResolver() { return new myViewResolver(); } public static class myViewResolver implements ViewResolver { @Override public View resolveViewName(String s, Locale locale) throws Exception { return null; } } } |
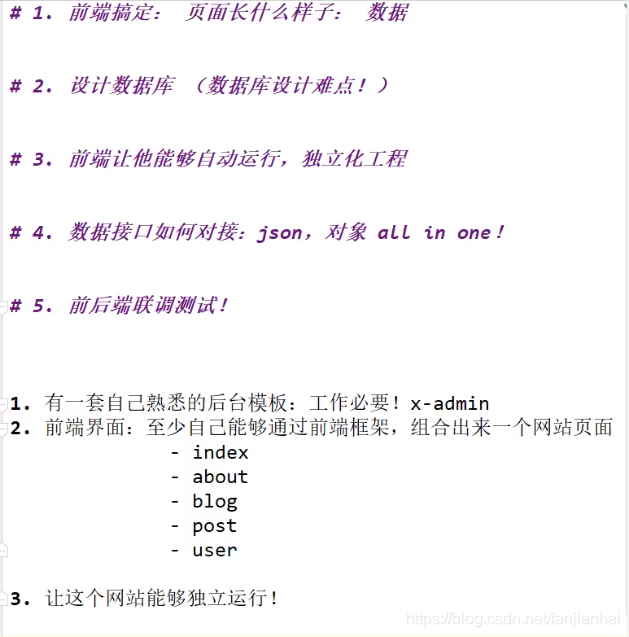
10. 员工管理系统springboot-04-system
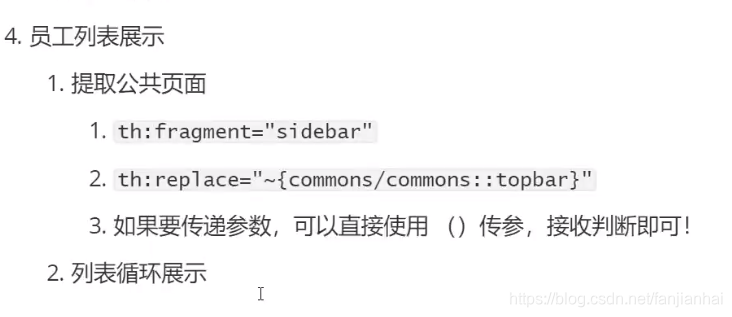
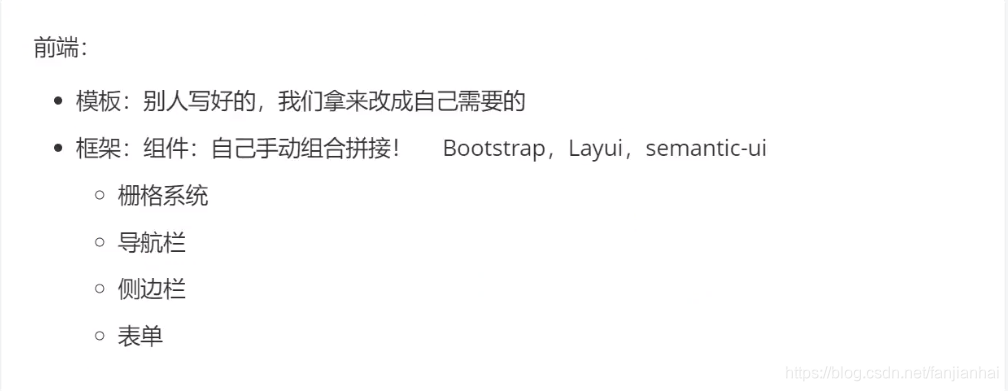
11. 如何写一个网站
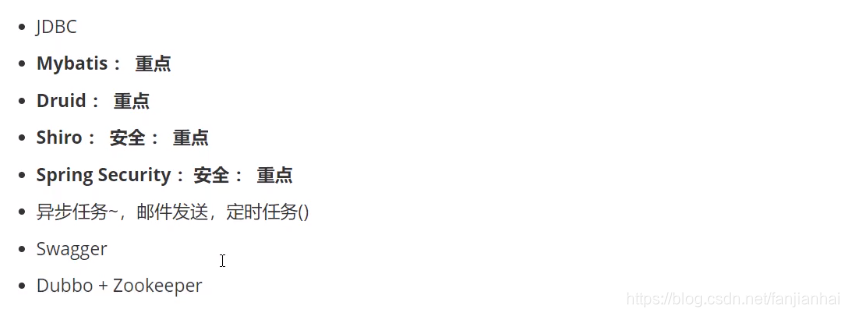
12. Spring Data
- JDBC
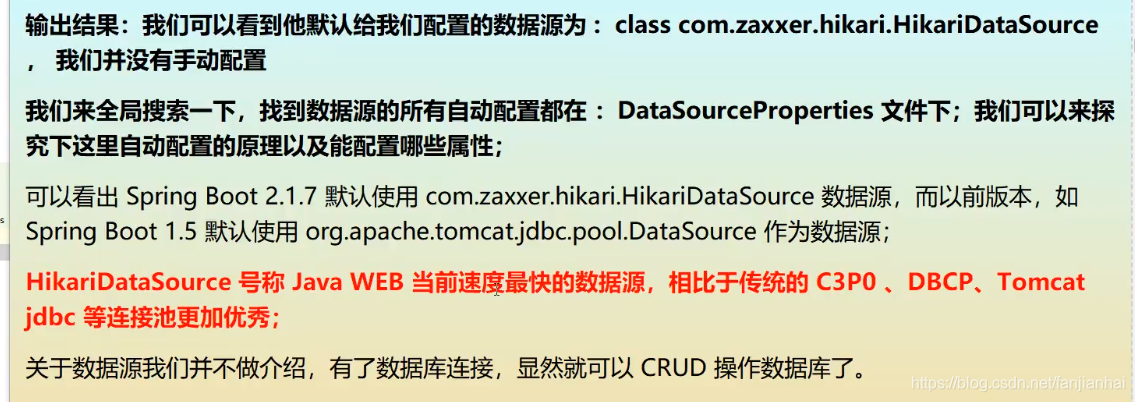
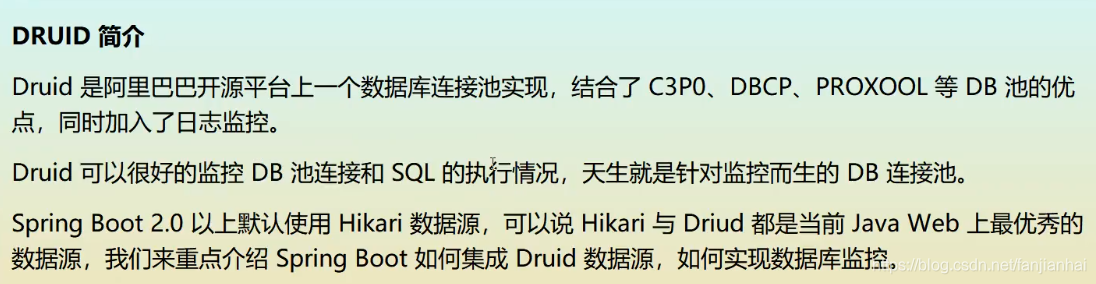
- Druid
1 2 3 4 5 6 7 8 9 10 11 12 13 14 15 16 17 18 19 20 21 22 23 24 25 26 27 28 29 30 31 |
spring: datasource: username: root password: 123456 # 如果时区报错了需要添加时区字段 serverTimezone url: jdbc:mysql://192.168.1.30:3306/mybatis?useUnicode=true&characterEncoding=utf-8 driver-class-name: com.mysql.cj.jdbc.Driver # 默认是用的是 com.zaxxer.hikari.HikariDataSource type: com.alibaba.druid.pool.DruidDataSource #Spring Boot 默认是不注入这些属性值的,需要自己绑定 #druid 数据源专有配置 initialSize: 5 minIdle: 5 maxActive: 20 maxWait: 60000 timeBetweenEvictionRunsMillis: 60000 minEvictableIdleTimeMillis: 300000 validationQuery: SELECT 1 FROM DUAL testWhileIdle: true testOnBorrow: false testOnReturn: false poolPreparedStatements: true #配置监控统计拦截的filters,stat:监控统计、log4j:日志记录、wall:防御sql注入 #如果允许时报错 java.lang.ClassNotFoundException: org.apache.log4j.Priority #则导入 log4j 依赖即可,Maven 地址:https://mvnrepository.com/artifact/log4j/log4j filters: stat,wall,log4j maxPoolPreparedStatementPerConnectionSize: 20 useGlobalDataSourceStat: true connectionProperties: druid.stat.mergeSql=true;druid.stat.slowSqlMillis=500 |
1 2 3 4 5 6 7 8 9 10 11 12 13 14 15 16 17 18 19 20 21 22 23 24 25 26 27 28 29 30 31 32 33 34 35 36 37 38 39 40 41 |
package com.xiaofan.config; import com.alibaba.druid.pool.DruidDataSource; import com.alibaba.druid.support.http.StatViewServlet; import org.springframework.boot.context.properties.ConfigurationProperties; import org.springframework.boot.web.servlet.ServletRegistrationBean; import org.springframework.context.annotation.Bean; import org.springframework.context.annotation.Configuration; import javax.sql.DataSource; import java.util.HashMap; import java.util.Map; @Configuration public class DruidConfig { @ConfigurationProperties(prefix = "spring.datasource") @Bean public DataSource druidDataSource() { return new DruidDataSource(); } @Bean public ServletRegistrationBean statViewServlet() { ServletRegistrationBean<StatViewServlet> bean = new ServletRegistrationBean<>(new StatViewServlet(), "/druid/*"); Map<String, String> initParams = new HashMap<>(); initParams.put("loginUsername", "admin"); //后台管理界面的登录账号 initParams.put("loginPassword", "123456"); //后台管理界面的登录密码 //后台允许谁可以访问 //initParams.put("allow", "localhost"):表示只有本机可以访问 //initParams.put("allow", ""):为空或者为null时,表示允许所有访问 initParams.put("allow", ""); //deny:Druid 后台拒绝谁访问 //initParams.put("kuangshen", "192.168.1.20");表示禁止此ip访问 //设置初始化参数 bean.setInitParameters(initParams); return bean; } } |
13. 整合mybaits框架
- pom.xml
1 2 3 4 5 6 |
<!--mybatis 自研--> <dependency> <groupId>org.mybatis.spring.boot</groupId> <artifactId>mybatis-spring-boot-starter</artifactId> <version>2.1.4</version> </dependency> |
- UserMapper.xml
1 2 3 4 5 6 7 8 9 10 11 12 13 14 15 16 17 18 19 20 21 22 23 24 25 26 |
<?xml version="1.0" encoding="UTF-8" ?> <!DOCTYPE mapper PUBLIC "-//mybatis.org//DTD Mapper 3.0//EN" "http://mybatis.org/dtd/mybatis-3-mapper.dtd"> <mapper namespace="com.xiaofan.mapper.UserMapper"> <select id="queryUserList" resultType="User"> select * from user </select> <select id="queryUserById" resultType="User"> select * from user where id = #{id} </select> <insert id="addUser" parameterType="User"> insert into user (id, name, pwd) values (#{id}, #{name}, #{pwd}) </insert> <update id="updateUser" parameterType="User"> update user set name = #{name}, pwd = #{pwd} where id = #{id} </update> <delete id="deleteUser" parameterType="int"> delete from user where id = #{id} </delete> </mapper> |
- Springboot整合mybatis
1 2 3 4 |
# 整合mybatis mybatis: type-aliases-package: com.xiaofan.pojo mapper-locations: classpath:mybatis/mapper/*.xml |
- 编写controller进行测试
1 2 3 4 5 6 7 8 9 10 11 12 13 14 15 16 17 18 19 20 21 22 23 24 25 |
package com.xiaofan.controller; import com.xiaofan.mapper.UserMapper; import com.xiaofan.pojo.User; import org.springframework.beans.factory.annotation.Autowired; import org.springframework.web.bind.annotation.GetMapping; import org.springframework.web.bind.annotation.RestController; import java.util.List; @RestController public class UserController { @Autowired UserMapper userMapper; @GetMapping("/queryUserList") public List<User> queryUserList() { List<User> users = userMapper.queryUserList(); for (User user : users) { System.out.println(user); } return users; } } |
14. SpringSecurity

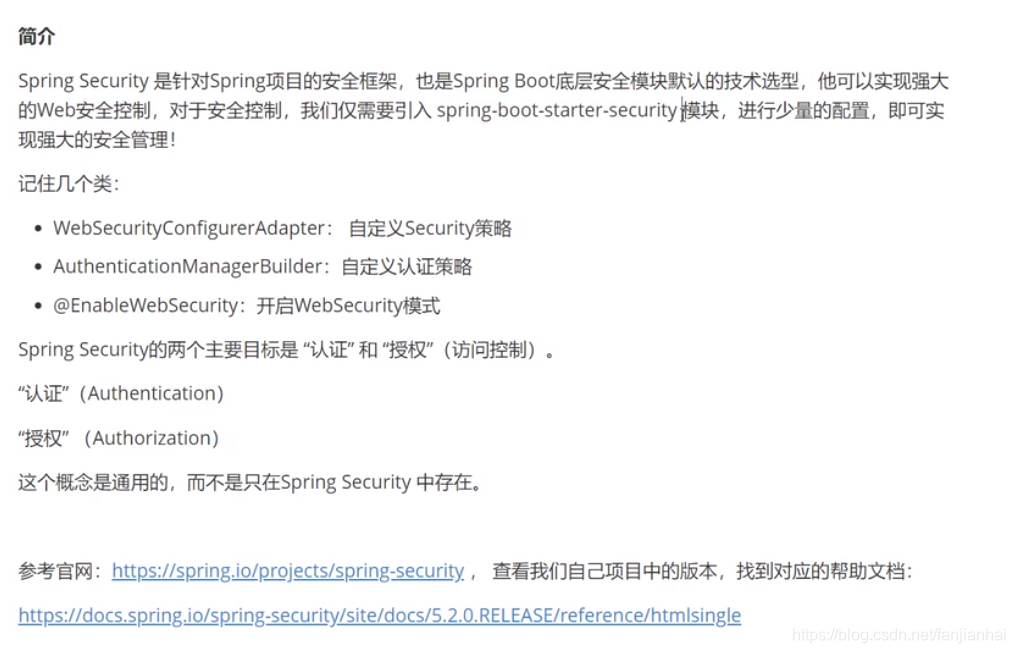
14.1. 核心点
- pom.xml
1 2 3 4 5 6 |
<!-- 整合 springsecurity thymeleaf --> <dependency> <groupId>org.thymeleaf.extras</groupId> <artifactId>thymeleaf-extras-springsecurity5</artifactId> <version>3.0.4.RELEASE</version> </dependency> |
- SecurityConfig.java
1 2 3 4 5 6 7 8 9 10 11 12 13 14 15 16 17 18 19 20 21 22 23 24 25 26 27 28 29 30 31 32 33 34 35 36 37 38 39 40 41 42 43 44 45 46 47 48 |
package com.xiaofan.config; import org.springframework.security.config.annotation.authentication.builders.AuthenticationManagerBuilder; import org.springframework.security.config.annotation.web.builders.HttpSecurity; import org.springframework.security.config.annotation.web.configuration.EnableWebSecurity; import org.springframework.security.config.annotation.web.configuration.WebSecurityConfigurerAdapter; import org.springframework.security.crypto.bcrypt.BCryptPasswordEncoder; // AOP: 拦截器! @EnableWebSecurity public class SecurityConfig extends WebSecurityConfigurerAdapter { // 授权 @Override protected void configure(HttpSecurity http) throws Exception { // 首页所有人可以访问, 功能页只有对应权限的人才能访问 // 请求授权规则 http.authorizeRequests() .antMatchers("/").permitAll() .antMatchers("/level1/**").hasRole("vip1") .antMatchers("/level2/**").hasRole("vip2") .antMatchers("/level3/**").hasRole("vip3"); // 没有权限,默认会到登录页面, 定制login页面 注意这里的链接和login.html表单中的做成一直就可以 http.formLogin().loginPage("/toLogin"); // 开启了注销功能 http.csrf().disable(); // 防止跨域攻击csrf springsecurity5不加也没报错 http.logout().logoutSuccessUrl("/"); // 开启记住我功能, 默认两周时间, 自定义接收前端的参数 http.rememberMe().rememberMeParameter("remember"); } // 认证, springboot 2.1.x 可以直接使用 // 密码编码: PasswordEncoder // 在Spring Security 5.0 + 增加了很多加密的方法 @Override protected void configure(AuthenticationManagerBuilder auth) throws Exception { auth.inMemoryAuthentication().passwordEncoder(new BCryptPasswordEncoder()) .withUser("xiaofan").password(new BCryptPasswordEncoder().encode("123456")).roles("vip1", "vip2") .and() .withUser("root").password(new BCryptPasswordEncoder().encode("123456")).roles("vip1", "vip2", "vip3") .and() .withUser("guest").password(new BCryptPasswordEncoder().encode("123456")).roles("vip1"); } } |
- index.html页面重点
1 |
<html lang="en" xmlns:th="http://www.thymeleaf.org" xmlns:sec="http://www.thymeleaf.org/thymeleaf-extras-springsecurity5"> |
1 2 3 4 5 6 7 8 9 10 11 12 13 14 15 16 17 18 19 20 |
<div sec:authorize="!isAuthenticated()"> <!--未登录--> <a class="item" th:href="@{/toLogin}"> <i class="address card icon"></i> 登录 </a> </div> <div sec:authorize="isAuthenticated()"> <a class="item"> 用户名:<span sec:authentication="name"></span> 角 色:<span sec:authentication="principal.authorities"></span> </a> </div> <div sec:authorize="isAuthenticated()"> <!--如果登录,用户名,注销--> <a class="item" th:href="@{/logout}"> <i class="sign-out icon"></i> 注销 </a> </div> |
1 2 3 4 5 6 7 8 9 10 11 12 13 14 15 16 17 18 19 20 21 22 23 24 25 |
package com.xiaofan.controller; import org.springframework.stereotype.Controller; import org.springframework.web.bind.annotation.GetMapping; import org.springframework.web.bind.annotation.PathVariable; @Controller public class RouteController { @GetMapping({"/", "/index"}) public String index() { return "index"; } @GetMapping("/toLogin") public String toLogin() { return "views/login"; } @GetMapping("/level{suffix}/{id}") public String level(@PathVariable("suffix") Integer suffix, @PathVariable("id") Integer id) { return "views/level" + suffix + "/" + id; } } |
15. Shiro
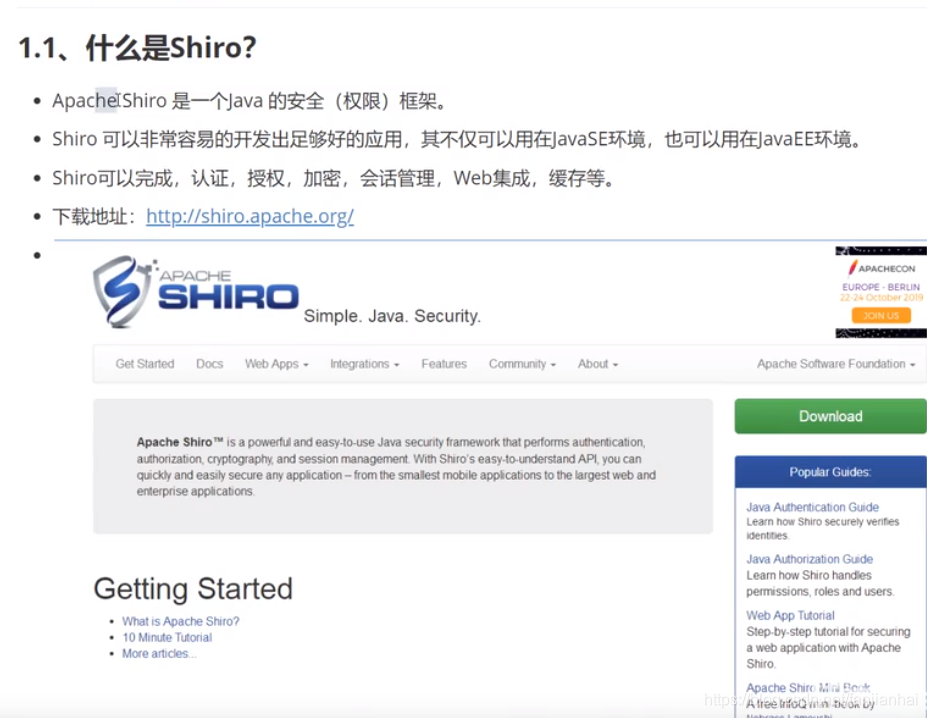
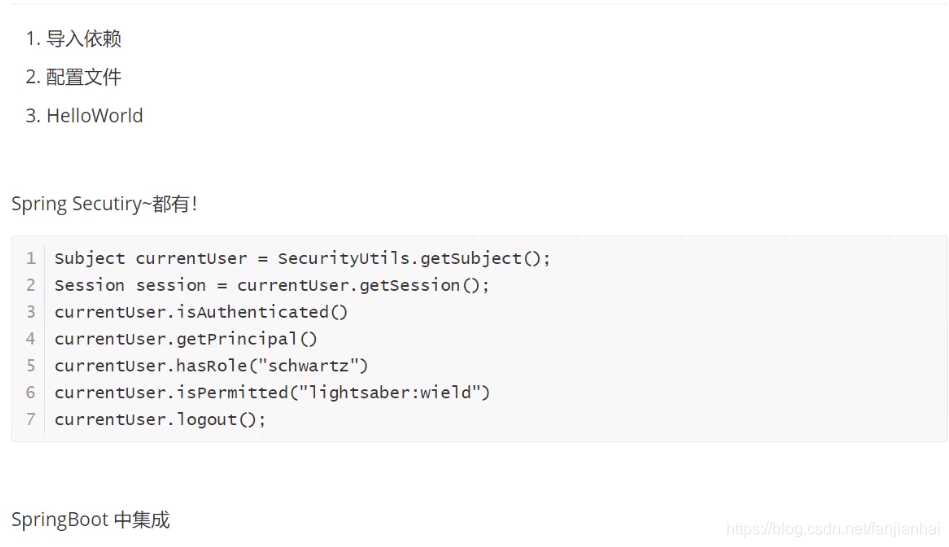
- 三大对象
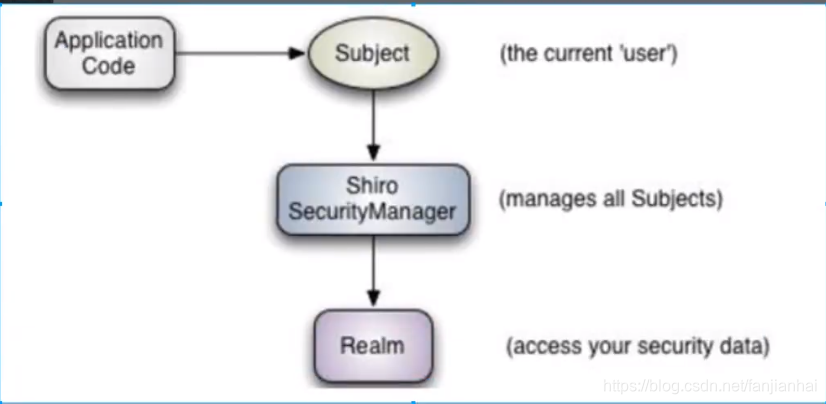
- Subject: 用户
- SecurityManager: 管理所有用户
- Realm: 连接数据
springboot-08-shiro下面包含了多个module
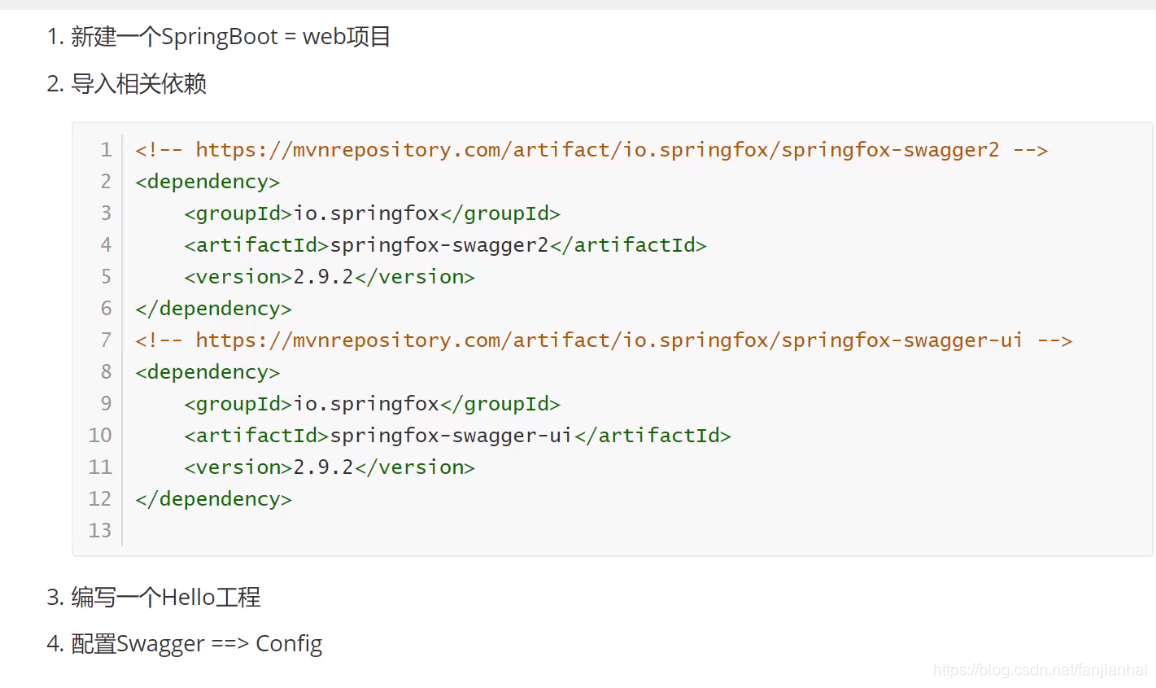
16. Swagger
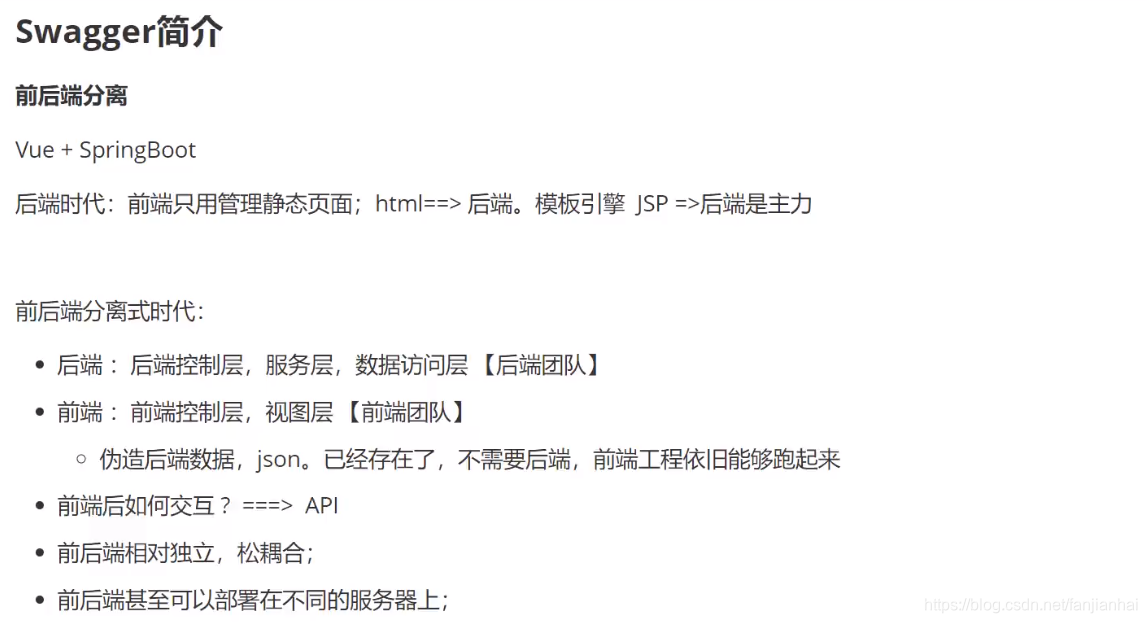
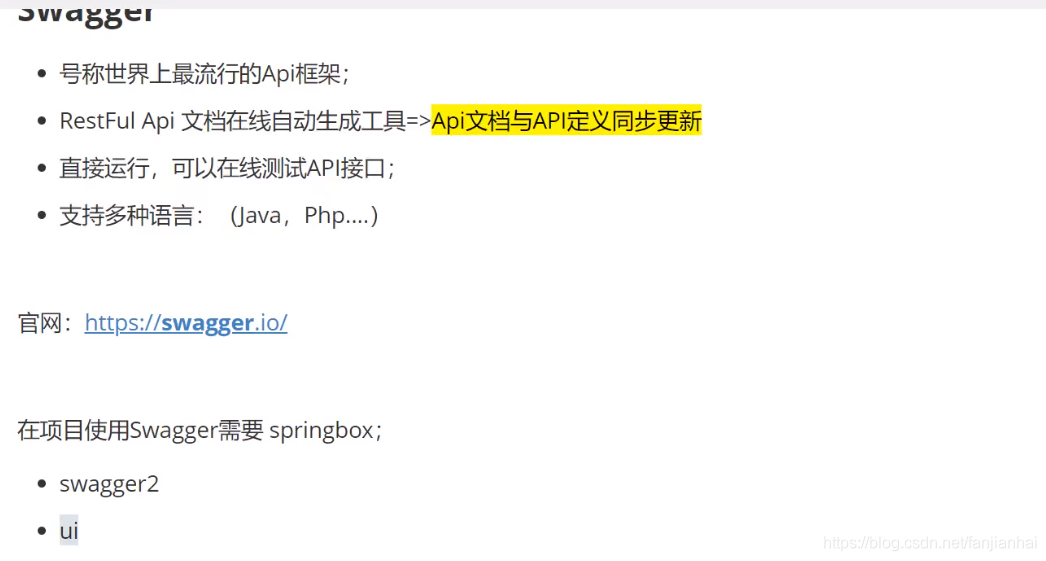
16.1. springboot集成swagger
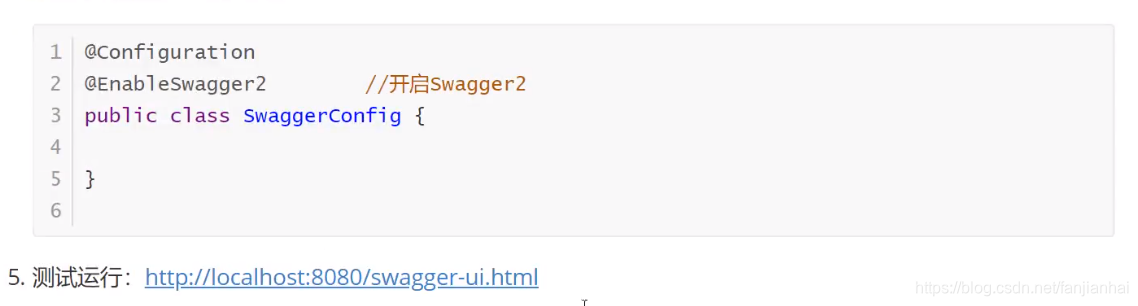
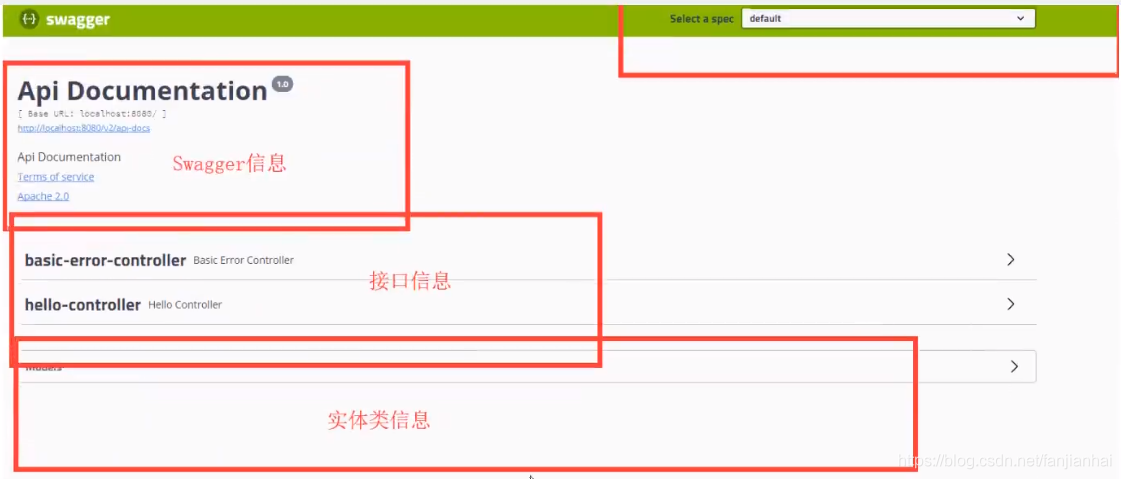
16.2. 配置Swagger
16.3. 配置Swagger接口扫描及开关
16.4. 配置多个分组
- application.yaml
1 2 3 4 5 6 7 8 9 10 11 12 13 14 15 16 17 18 19 20 21 22 23 24 25 |
spring: profiles: active: dev --- server: port: 8080 spring: config: activate: on-profile: dev --- server: port: 8080 spring: config: activate: on-profile: test --- server: port: 8080 spring: config: activate: on-profile: prod |
- SwaggerConfig.java
1 2 3 4 5 6 7 8 9 10 11 12 13 14 15 16 17 18 19 20 21 22 23 24 25 26 27 28 29 30 31 32 33 34 35 36 37 38 39 40 41 42 43 44 45 46 47 48 49 50 51 52 53 54 55 56 57 58 59 60 61 62 63 64 65 66 67 68 69 70 71 72 73 74 75 76 77 78 79 80 |
package com.xiaofan.config; import org.springframework.context.annotation.Bean; import org.springframework.context.annotation.Configuration; import org.springframework.core.env.Environment; import org.springframework.core.env.Profiles; import springfox.documentation.builders.PathSelectors; import springfox.documentation.builders.RequestHandlerSelectors; import springfox.documentation.service.ApiInfo; import springfox.documentation.service.Contact; import springfox.documentation.spi.DocumentationType; import springfox.documentation.spring.web.plugins.Docket; import springfox.documentation.swagger2.annotations.EnableSwagger2; import java.util.ArrayList; @Configuration @EnableSwagger2 public class SwaggerConfig { @Bean public Docket docket1() { return new Docket(DocumentationType.SWAGGER_2).groupName("A"); } @Bean public Docket docket2() { return new Docket(DocumentationType.SWAGGER_2).groupName("B"); } @Bean public Docket docket3() { return new Docket(DocumentationType.SWAGGER_2).groupName("C"); } @Bean public Docket docket(Environment environment) { // 设置要显示swagger环境 Profiles profiles = Profiles.of("dev", "test"); // 判断是否处在在自己设定的环境当中 boolean flag = environment.acceptsProfiles(profiles); return new Docket(DocumentationType.SWAGGER_2) .apiInfo(apiInfo()) .enable(flag) // 是否启动swagger .groupName("雪山飞狐") .select() /** * 配置要扫描的接口的方式 RequestHandlerSelectors * basePackage:指定要扫描的包 * any(): 扫描全部 * none():不扫描 * withClassAnnotation(RestController.class): 扫描类上有RestController.class的注解 * withMethodAnnotation(GetMapping.class): 扫描方法上的注解 */ .apis(RequestHandlerSelectors.basePackage("com.xiaofan.controller")) // 过滤请求路径 .paths(PathSelectors.ant("/xiaofan/**")) .build(); } private ApiInfo apiInfo() { // 作者信息 Contact contact = new Contact("雪山飞狐", "https://blog.csdn.net/fanjianhai", "594042358@qq.com"); return new ApiInfo( "小范的SwaggerAPI文档", "即使再小的帆也能远航", "v1.0", "https://github.com/fanjianhai/kuangshen", contact, "Apache 2.0", "http://www.apache.org/licenses/LICENSE-2.0", new ArrayList<>() ); } } |
- HelloController.java
1 2 3 4 5 6 7 8 9 10 11 12 13 14 15 16 17 18 19 20 21 22 23 24 25 26 27 28 29 30 31 32 33 34 35 36 37 38 39 40 |
package com.xiaofan.controller; import com.xiaofan.pojo.User; import io.swagger.annotations.ApiOperation; import io.swagger.annotations.ApiParam; import org.springframework.web.bind.annotation.*; @RestController public class HelloController { @ApiOperation("hello测试") @GetMapping("/xiaofan/hello") public String hello() { return "hello swagger!"; } /** * 只要我们的接口中,返回值中存在实体类,它就会被扫描的swagger中 */ @PostMapping("/xiaofan/user") public User user() { return new User("东邪", "黄药师"); } @ApiOperation("登录接口") @PostMapping("/xiaofan/login") public String login(@ApiParam("用户名") String username, @ApiParam("用户密码") String password) { return "login succeed!"; } @ApiOperation("测试前端传递json接口") @PostMapping(value="/xiaofan/jsontest") public String jsonTest(@ApiParam("json传参") @RequestBody String json){ System.out.println(json); return json; } } |
16.5. swagger2常用注解说明
常用注解:
- **@Api()**用于类;
表示标识这个类是swagger的资源 - **@ApiOperation()**用于方法;
表示一个http请求的操作 - **@ApiParam()**用于方法,参数,字段说明;
表示对参数的添加元数据(说明或是否必填等) - **@ApiModel()**用于类
表示对类进行说明,用于参数用实体类接收 - **@ApiModelProperty()**用于方法,字段
表示对model属性的说明或者数据操作更改 - **@ApiIgnore()**用于类,方法,方法参数
表示这个方法或者类被忽略 - @ApiImplicitParam() 用于方法
表示单独的请求参数 - @ApiImplicitParams() 用于方法,包含多个 @ApiImplicitParam
16.6. 总结

17. 任务
17.1. 异步任务
@EnableAsync
@SpringBootApplication
public class Springboot10TaskApplication {

|  |  |
| --- | --- |
| ``` 1 2 3 4 5 6 7 8 9 10 11 12 ``` | ```  ```java @Async // 告诉spring这是一个异步方法 public String hello() {     try {         Thread.sleep(3000);     } catch (InterruptedException e) {         e.printStackTrace();     }     System.out.println("执行完毕...");     return "hello async"; } ``` |
17.2. 邮件任务以qq邮箱为例
- maven坐标
1 2 3 4 5 |
<!--底层导入的本质还是javax.mail 配置--> <dependency> <groupId>org.springframework.boot</groupId> <artifactId>spring-boot-starter-mail</artifactId> </dependency> |
- yaml配置
1 2 3 4 5 6 7 |
spring: mail: username: 594042358@qq.com password: qrfrhtepnixxbeje host: smtp.qq.com # qq 邮箱需要开启这个 properties: {"mail.smtp.ssl.enable": "true"} |
- 测试类
1 2 3 4 5 6 7 8 9 10 11 12 13 14 15 16 17 18 19 20 21 22 23 24 25 26 27 28 29 30 31 32 33 34 35 36 37 38 39 40 41 42 43 44 45 46 47 48 49 50 51 52 |
package com.xiaofan; import org.junit.jupiter.api.Test; import org.springframework.beans.factory.annotation.Autowired; import org.springframework.boot.test.context.SpringBootTest; import org.springframework.mail.SimpleMailMessage; import org.springframework.mail.javamail.JavaMailSenderImpl; import org.springframework.mail.javamail.MimeMailMessage; import org.springframework.mail.javamail.MimeMessageHelper; import javax.mail.MessagingException; import javax.mail.internet.MimeMessage; import java.io.File; @SpringBootTest class Springboot10TaskApplicationTests { @Autowired JavaMailSenderImpl mailSender; @Test void contextLoads() { SimpleMailMessage simpleMailMessage = new SimpleMailMessage(); simpleMailMessage.setSubject("文飞扬你好呀~"); simpleMailMessage.setText("你这家伙又在玩游戏了??"); simpleMailMessage.setTo("594042358@qq.com"); simpleMailMessage.setFrom("594042358@qq.com"); mailSender.send(simpleMailMessage); } @Test void contextLoads2() throws MessagingException { // 一个复杂的邮件~ MimeMessage mimeMessage = mailSender.createMimeMessage(); // 组装 MimeMessageHelper helper = new MimeMessageHelper(mimeMessage, true); // 正文 helper.setSubject("雪山飞狐你好呀~plus"); helper.setText("<p style='color:red'>你这家伙又在玩游戏了??</p>", true); // 添加附件 helper.addAttachment("abc.jpg", new File("C:\\Users\\59404\\Pictures\\images\\jar\\abc.jpg")); helper.setTo("594042358@qq.com"); helper.setFrom("594042358@qq.com"); mailSender.send(mimeMessage); } } |
17.3. 定时执行任务
- 任务调度者:TaskScheduler
- 任务执行者:TaskExecutor
- 开启定时注解的功能:@EnableScheduling
1 2 3 4 5 6 7 8 9 10 11 12 13 14 |
package com.xiaofan.service; import org.springframework.scheduling.annotation.Scheduled; import org.springframework.stereotype.Service; @Service public class ScheduledService { // 每隔3秒钟执行一次 @Scheduled(cron = "0/3 * * * * ?") public void hello() { System.out.println("hello, 你被执行了~"); } } |
18.SpringBoot整合redis
https://github.com/fanjianhai/kuangshen/tree/master/7.redis%E5%AD%A6%E4%B9%A0%E7%AC%94%E8%AE%B0
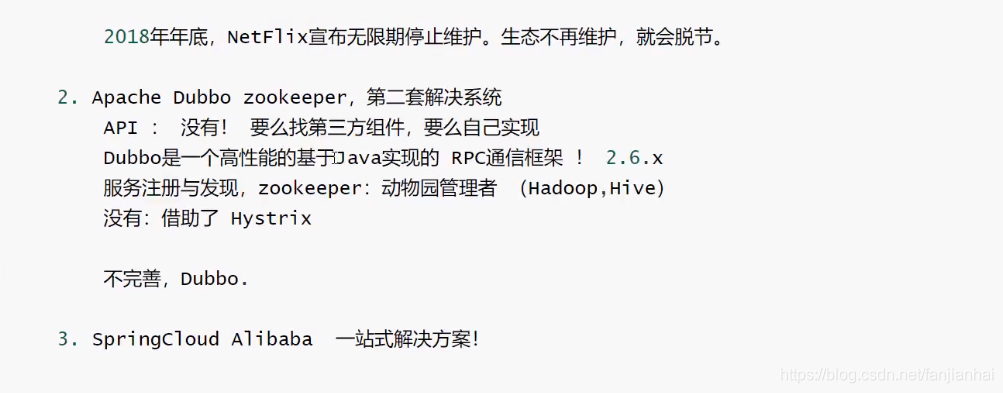
19. 分布式 Dubbo + Zookeeper
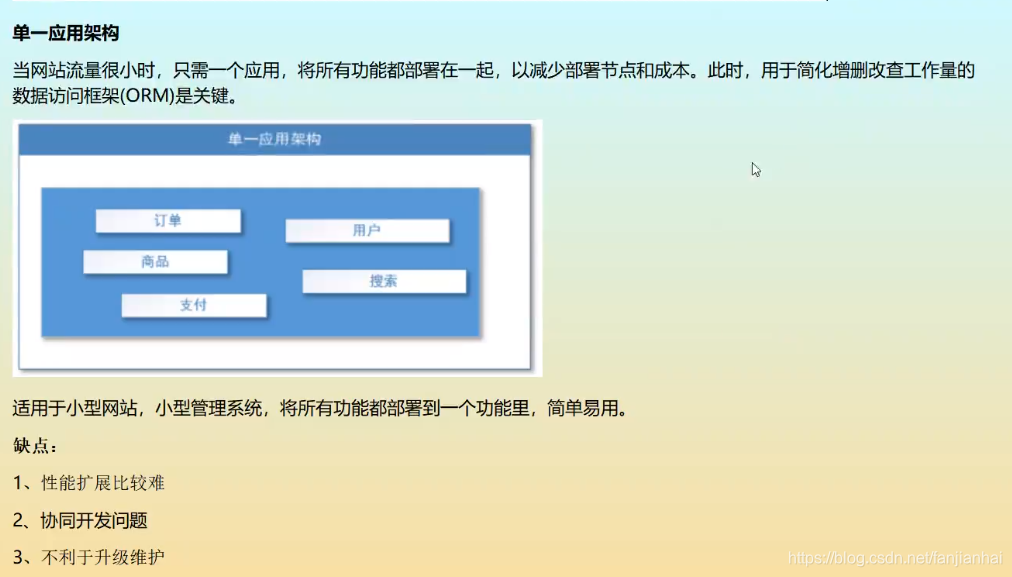
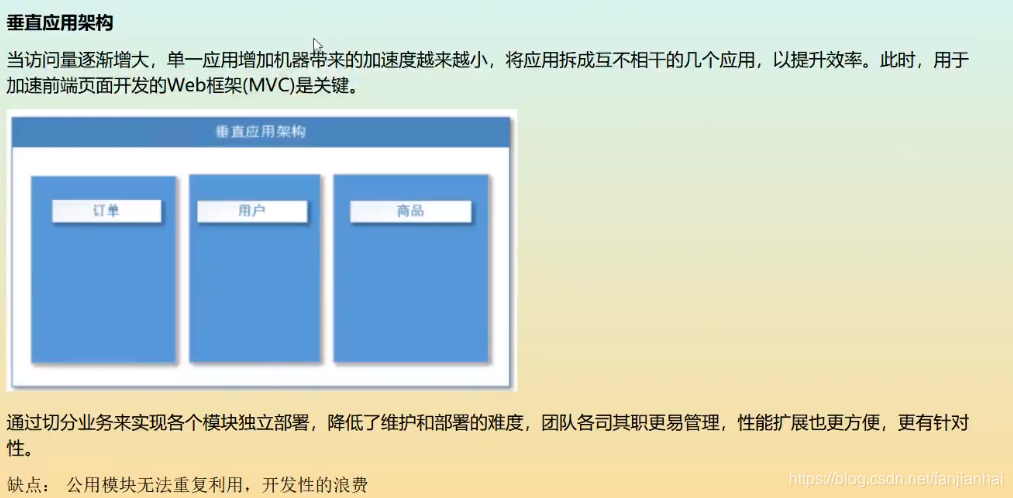
19.1. 分布式
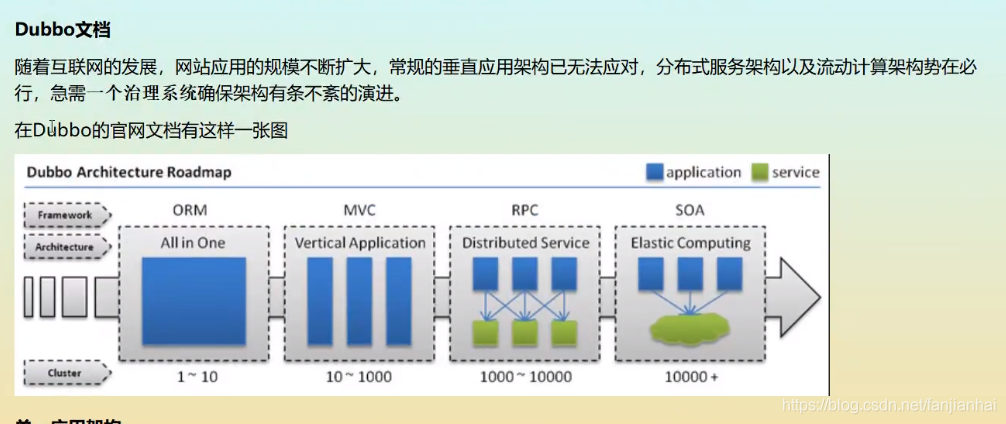
19.2. RPC

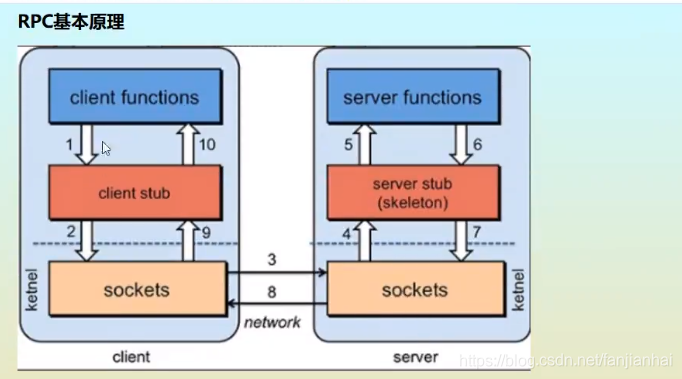
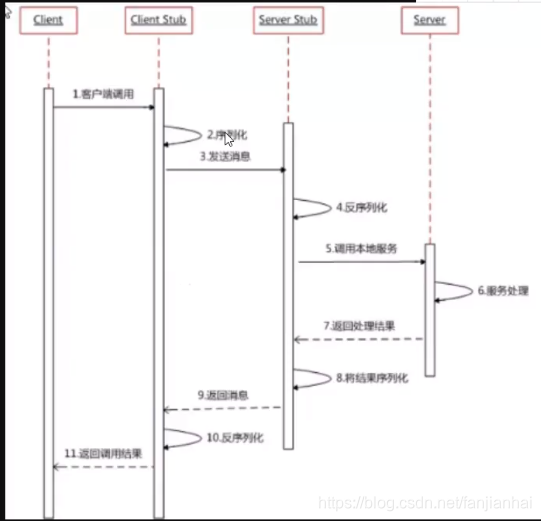
RPC两个核心模块:通讯,序列化

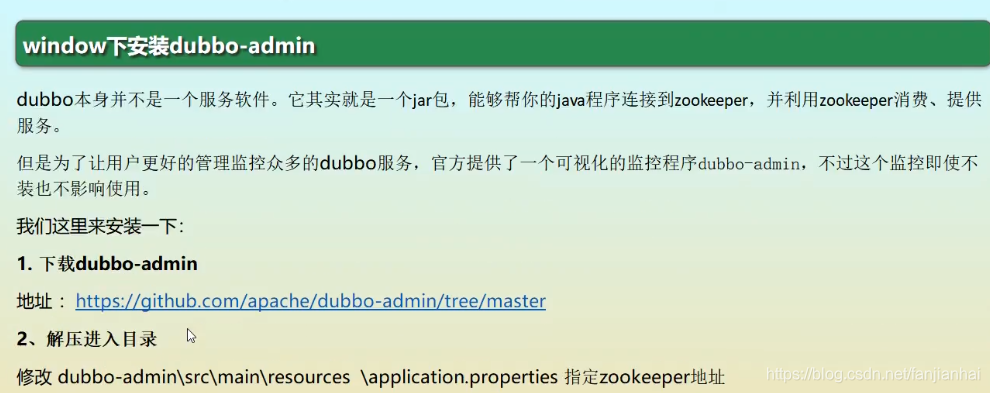
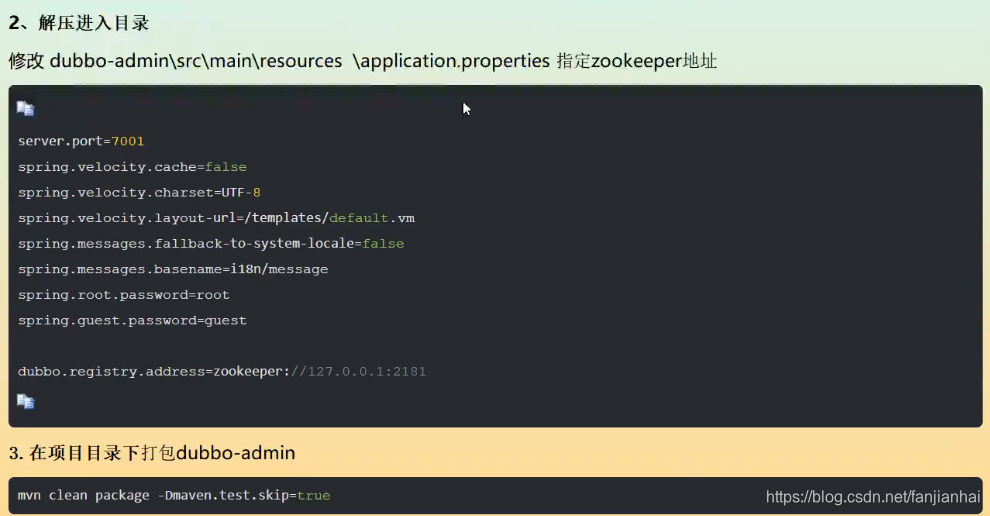
19.3. Dubbo

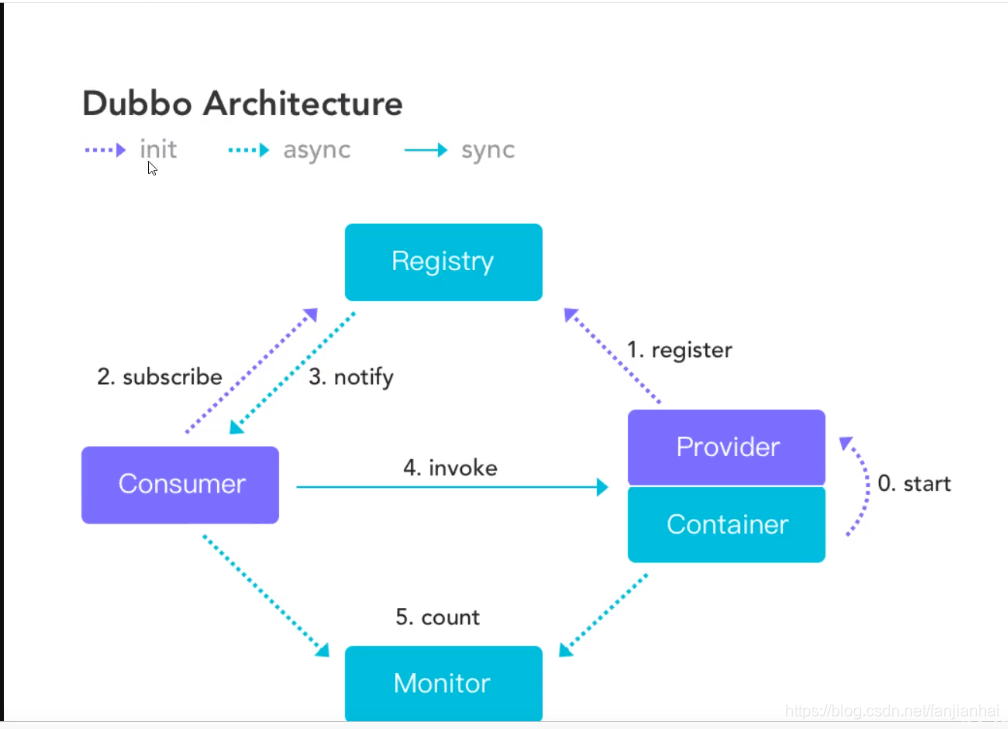
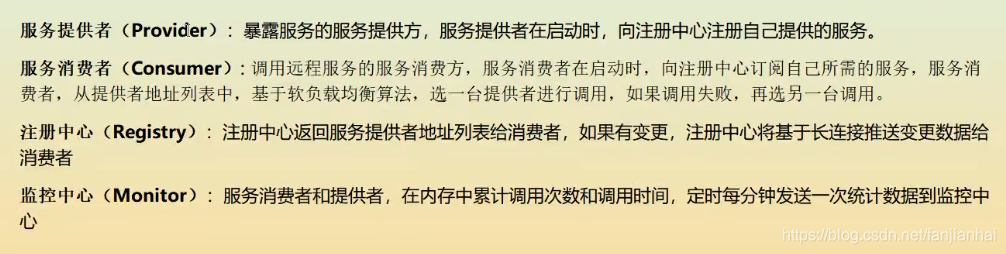
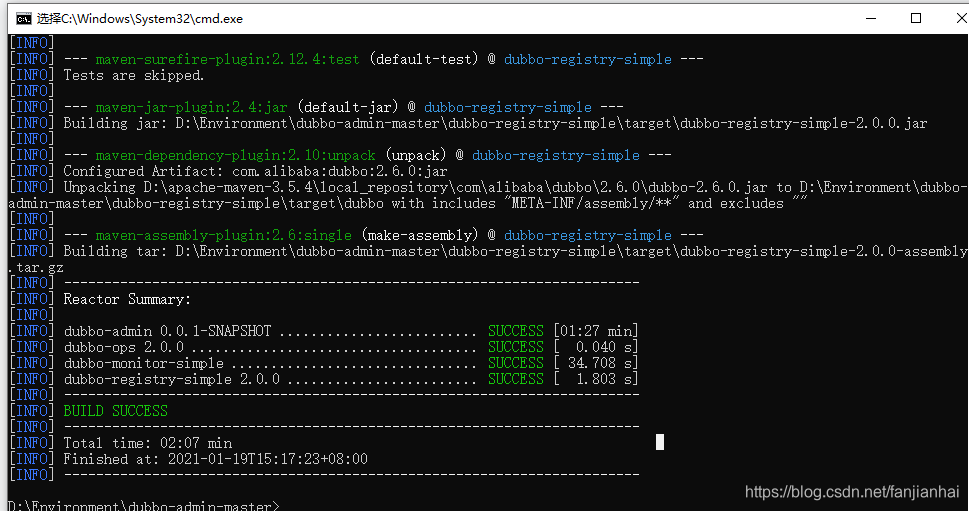
- 安装zookeeper(3.4.3)
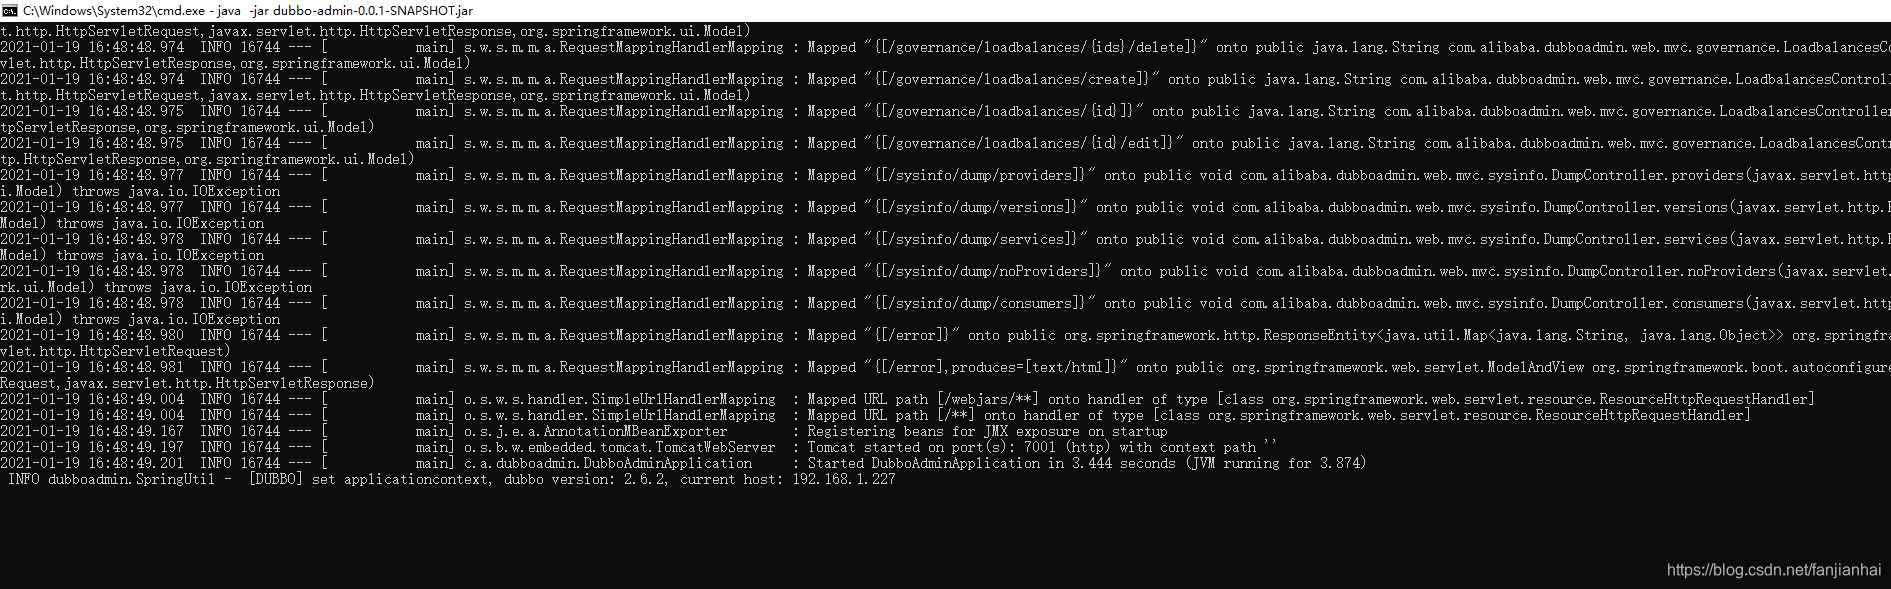
- 安装Dubbo
19.4. 服务发现
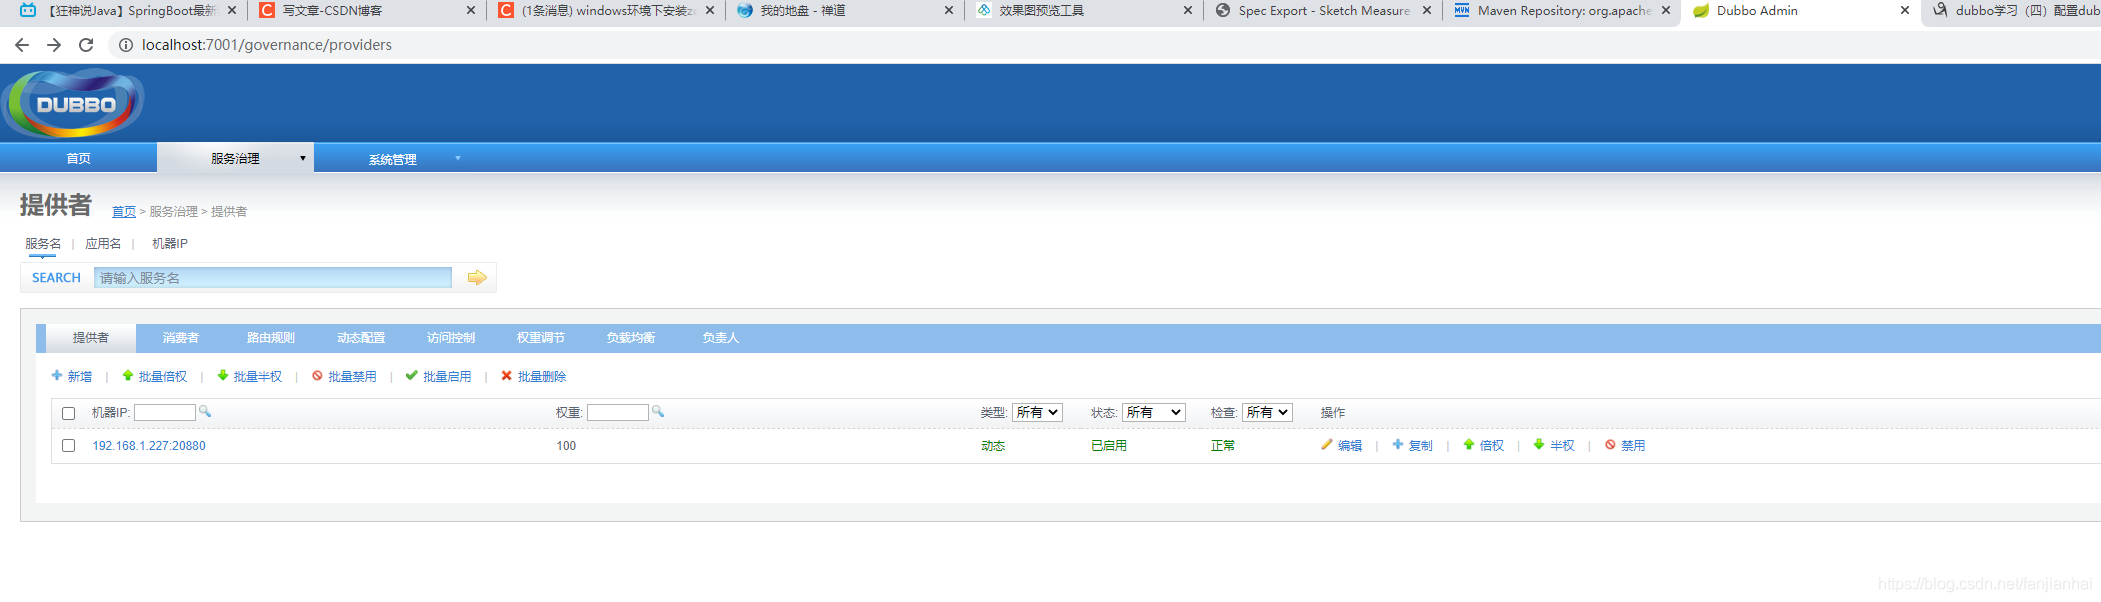
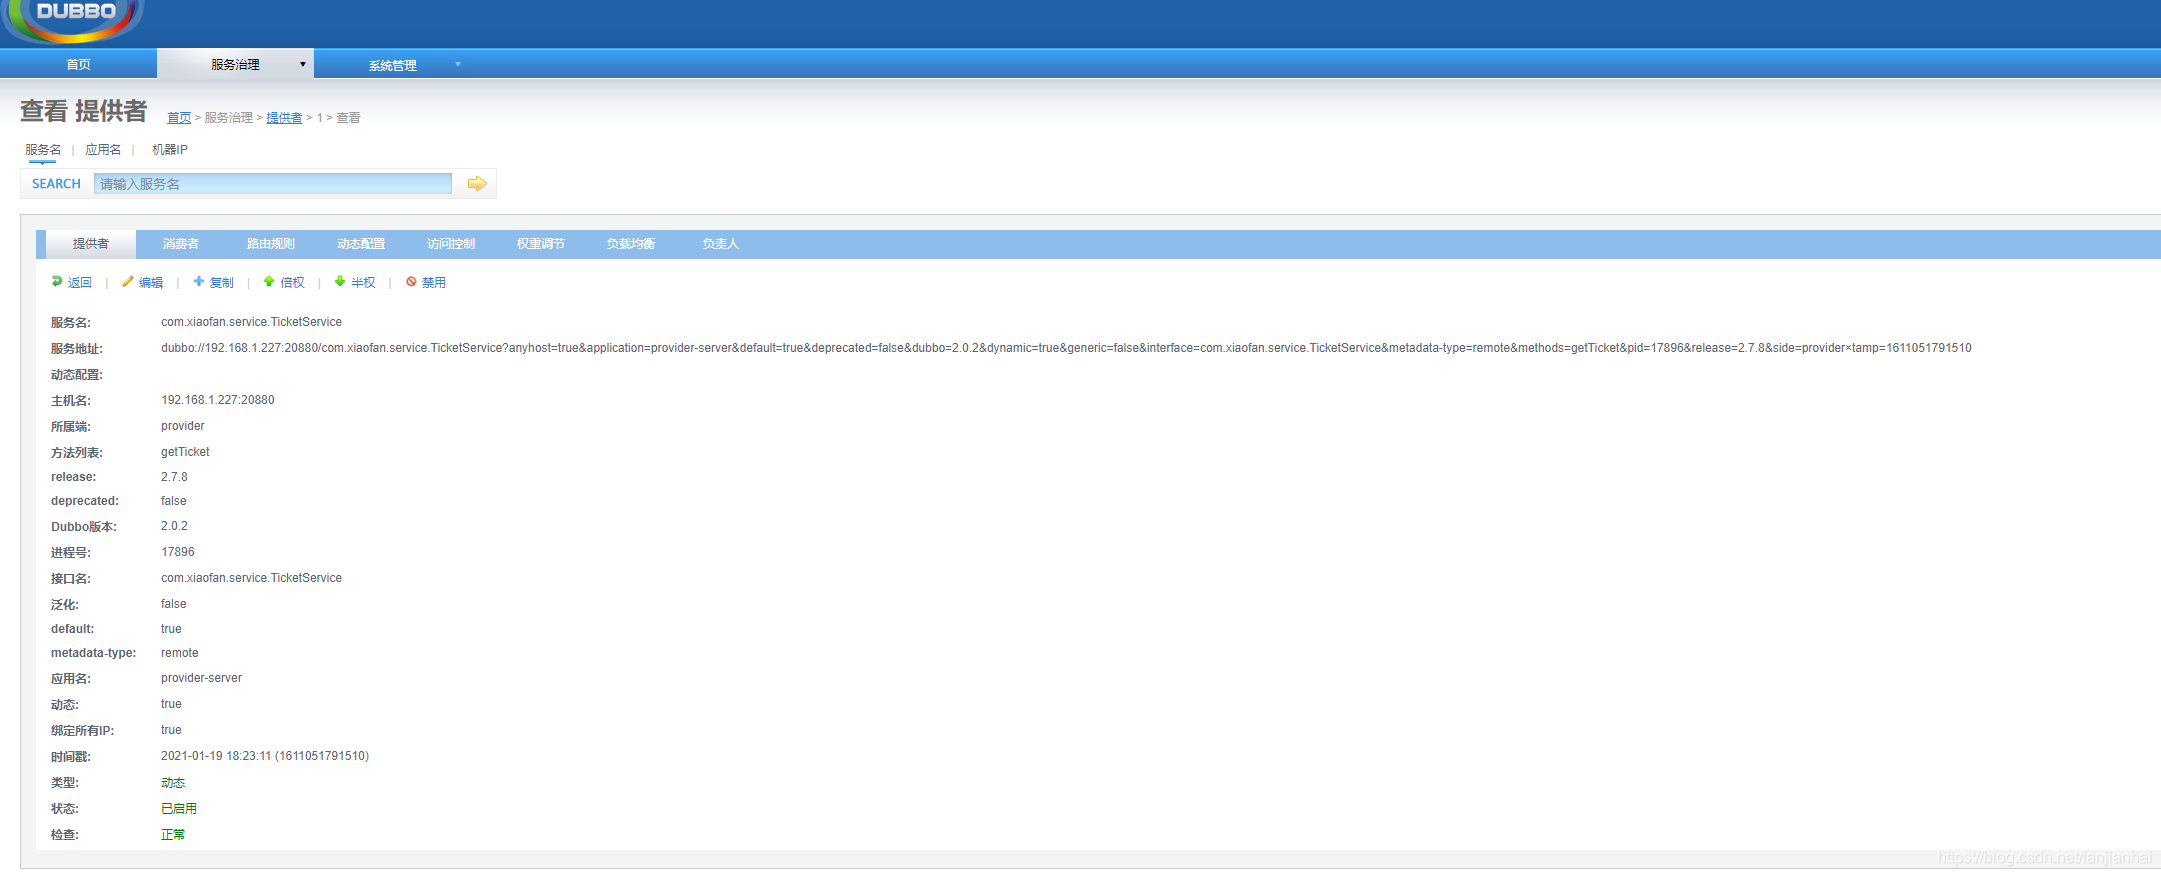
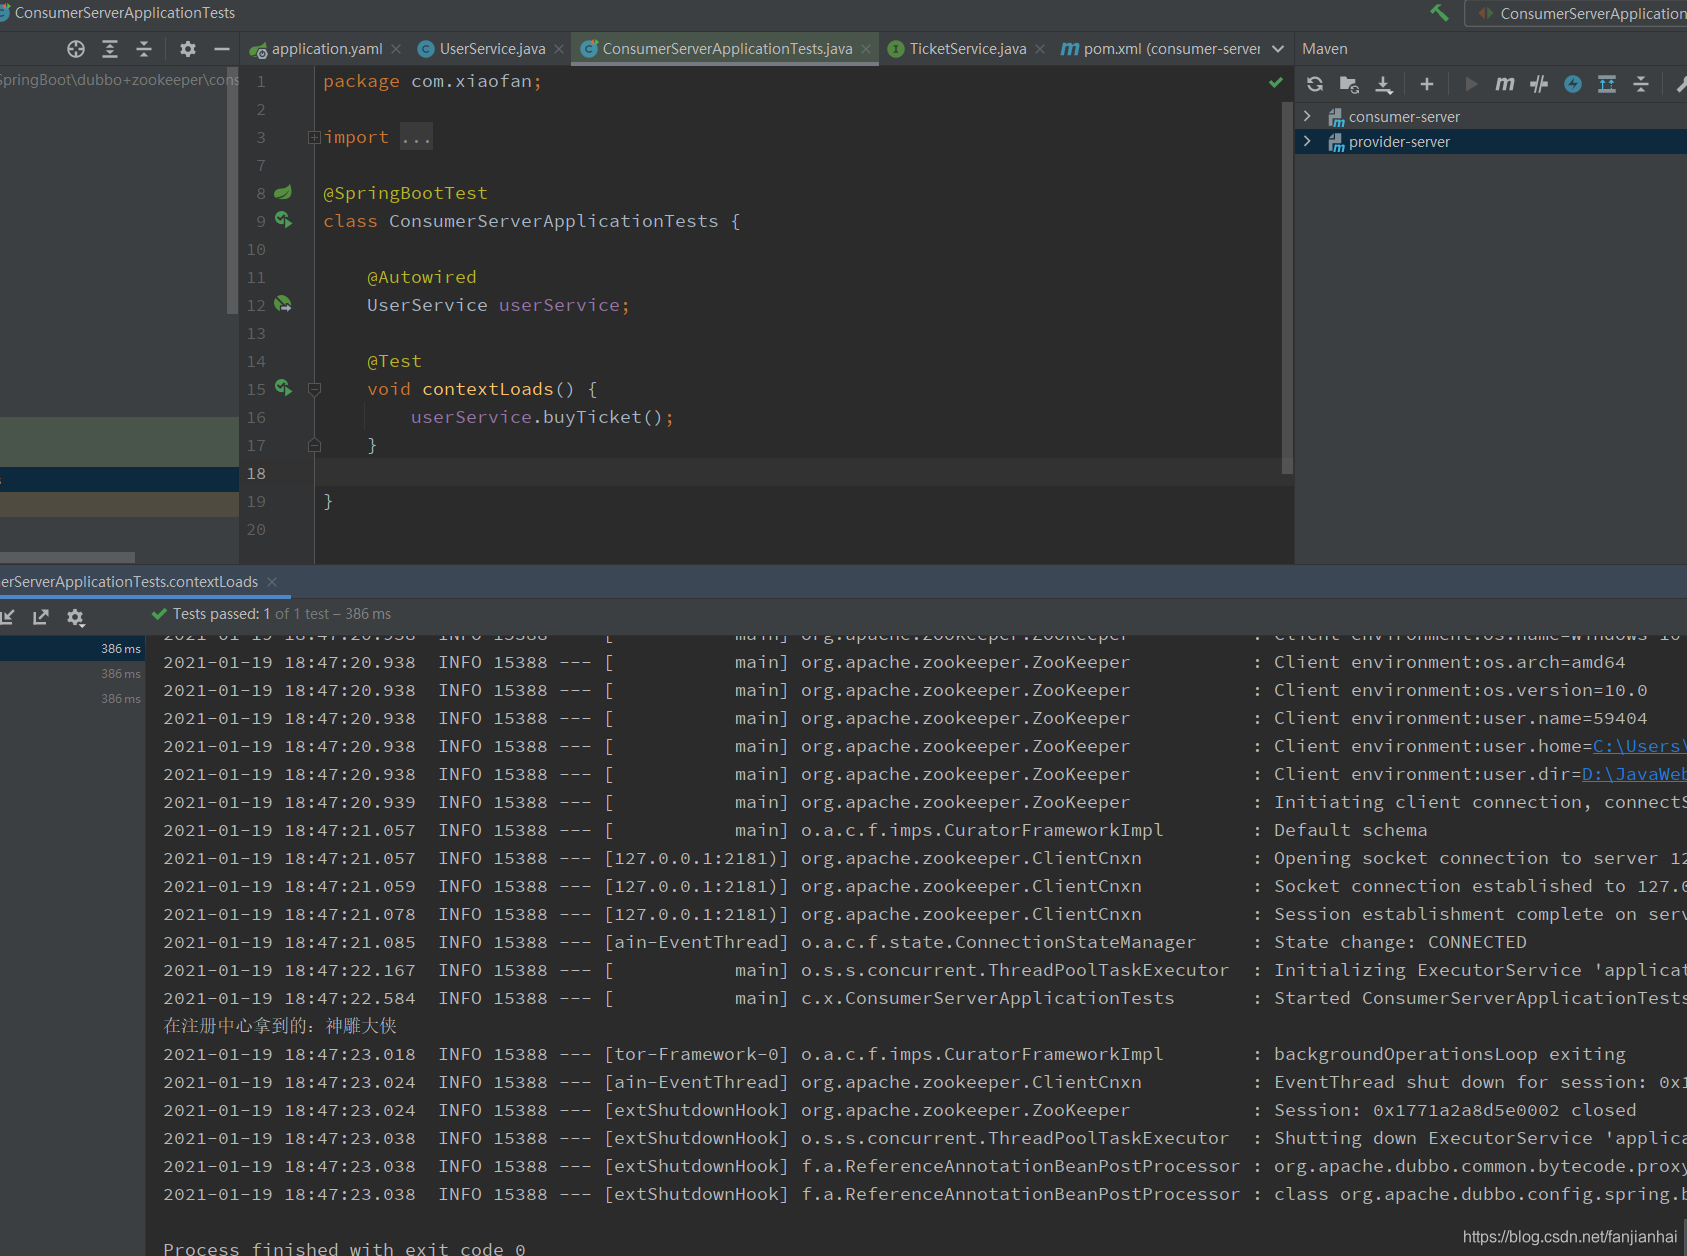
Dubbo + Zookeeper 还得深入研究,这里只是简单的测试!
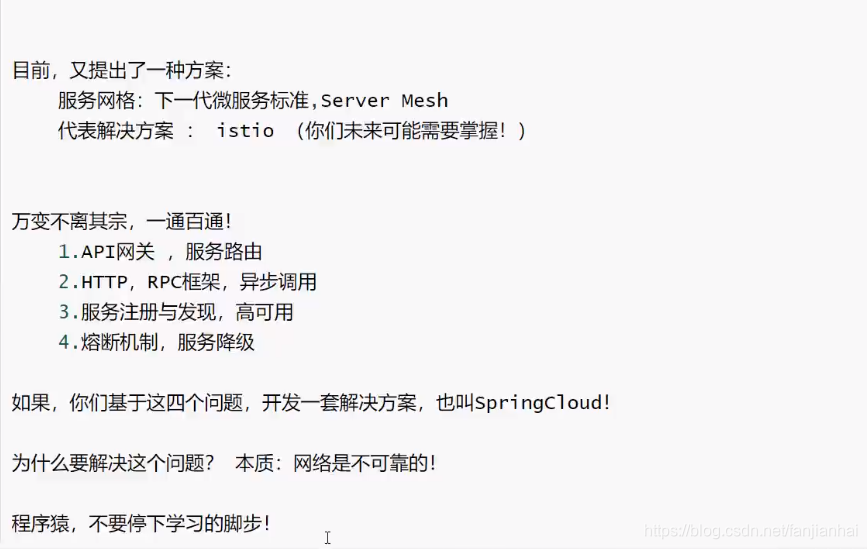
19.5. Dubbo+Zookeeper vs Spring Cloud 之间的比较
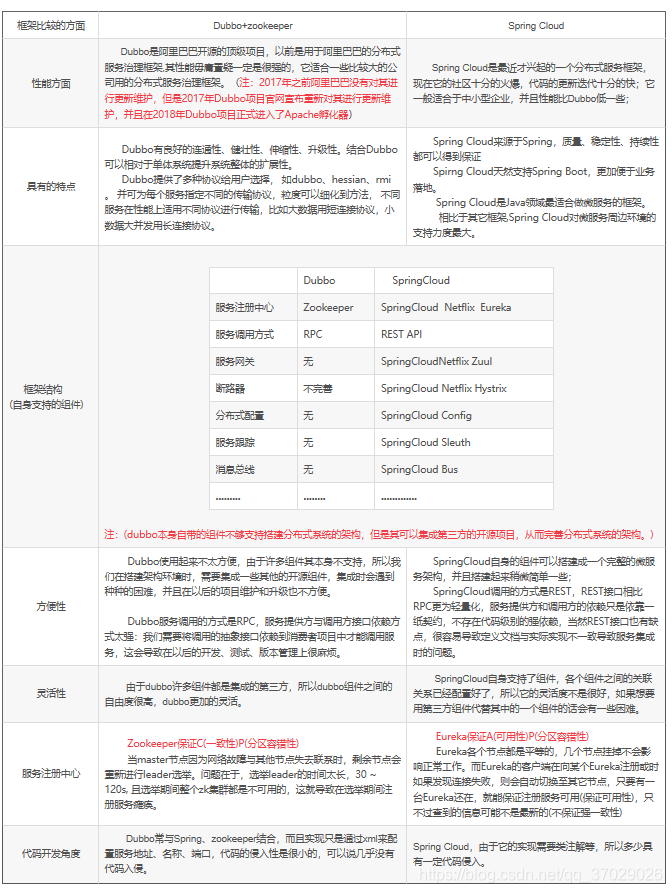
总的来说这两个搭建分布式系统的框架各有各的好处,在选择时要根据自己的需求等情况综合做选择;
但是Eureka作为单纯的服务注册中心来说感觉要比Zookeeper更加“专业”,因为注册服务更重要的是高可用性,可以接受短期内,达不到一致性的状况
20.回顾